How to Create Stylized Text Effects (3D, Neon, Metallic) Quickly with Photoshop Layer Styles & Presets
In this tutorial, we’ll show you how to create 3D, neon, and metallic text effects using Photoshop layer styles and presets—no complicated tools or third-party plugins needed. With the right layer settings and a few creative tricks, you can produce stunning results in minutes.
🎯 Want to save time and skip manual setup? Download ready-to-use Typography & Title Presets from Pixflow and apply professional styles with one click!


Why Use Photoshop Layer Styles for Text Effects?
Here’s why they’re perfect for stylized text:
- 🔄 Reusable: Save your custom styles as .asl presets and use them across projects.
- ⚡ Fast: No need to build effects from zero—styles do the heavy lifting.
- 🎨 Flexible: Mix and match layer effects for unique combinations (like metallic + glow).
- 🧩 Customizable: Each layer effect is editable at any time.
Whether you’re after a realistic chrome finish or a glowing cyberpunk title, layer styles help you execute your vision efficiently.
Tools You Will Need
✅ Required:
- Adobe Photoshop (CC 2020 or newer recommended)
- A bold or display font (clean lines work best for 3D and metallic effects)
- A new or existing canvas to experiment on
🔽 Optional (but helpful):
- Custom Layer Styles (.asl) — either self-made or downloaded
- Background textures to make your effects pop (e.g., grunge, concrete, night skies)
💡 Pro tip: You can get high-quality pre-made styles like neon, 3D, and chrome effects from trusted sources. Start with Pixflow’s Photoshop Typography Templates and speed up your design process.
Creating a 3D Text Effect in Photoshop
Step-by-Step Tutorial:
- Create Your Text
- Use the Type Tool (T) to enter your desired text.
- Choose a thick, sans-serif font like Montserrat, Anton, or Impact.
- Apply Base Layer Style
- Open the Layer Style panel by double-clicking the text layer.
- Check and enable:
- Bevel & Emboss: Set depth to ~300%, size to ~10px.
- Contour: Use the default shape or a custom one for edge highlights.
- Drop Shadow: Add depth and dimension.
- Simulate Extrusion
- Duplicate the text layer multiple times (Cmd/Ctrl + J).
- Move each layer 1px down and right, then merge them (Shift + Click all layers, then Cmd/Ctrl + E).
- Place the original on top to keep sharp text edges.
- Color and Light
- Add a gradient overlay or use lighting filters to make the 3D effect pop.
✅ Bonus Tip:
To save this style, go to Styles panel → New Style and export it as a .asl file.

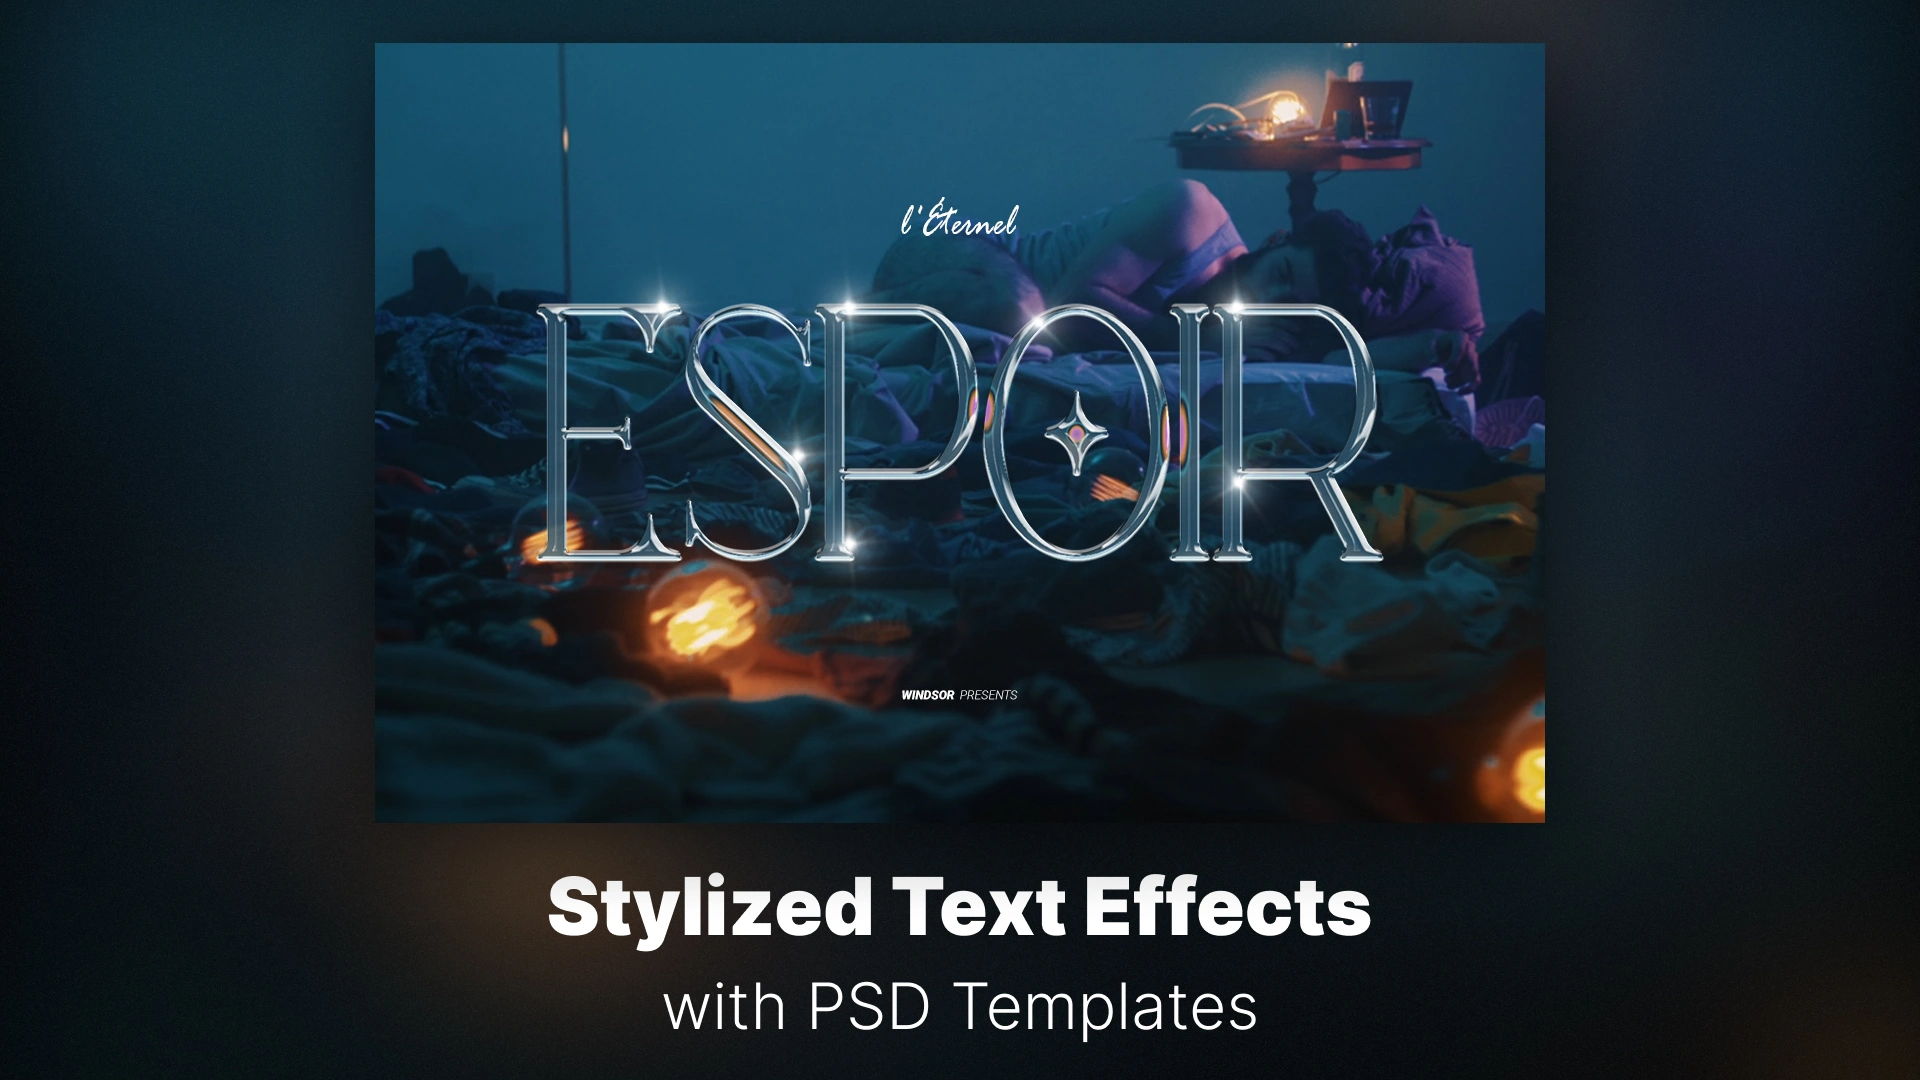
Creating a Neon Text Effect with Layer Styles
Step-by-Step Tutorial:
- Choose a Rounded or Script Font
- Fonts with soft curves and fluid shapes amplify the neon look.
- Apply Layer Styles
- Open the Layer Style panel and enable:
- Outer Glow: Use a strong color (e.g., cyan, magenta, or green), set the blend mode to Screen, and size to ~60px.
- Inner Glow: Use a lighter shade of your main glow color; adjust opacity to ~50–70%.
- Color Overlay: Pick a vibrant base color to match your glow.
- Drop Shadow: Adds depth and separation from background.
- Open the Layer Style panel and enable:
- Add Background for Contrast
- A dark background enhances the glow. Use a subtle vignette or gradient for added realism.
- Use Blur for a Soft Glow
- Convert the text to a smart object → apply a slight Gaussian Blur on a duplicate layer to spread the light.
🎨 Optional Enhancements:
- Add cables or tubes around the text using Pen Tool paths.
- Simulate flickering by duplicating the layer and applying Opacity changes in a video timeline.

Creating a Metallic Text Effect in Photoshop
Step-by-Step Tutorial:
- Start with a Bold, Solid Font
- Strong fonts like Bebas Neue, Oswald, or League Spartan work best.
- Apply Layer Styles
- Open the Layer Style panel, then:
- Gradient Overlay: Choose a gradient from light gray to dark gray for silver, or use gold/copper tones. Set blend mode to Overlay or Soft Light.
- Satin: Use a dark color with Multiply blend mode to simulate internal reflections.
- Bevel & Emboss: Set Style to Inner Bevel, Technique to Smooth, and adjust Size/Depth for metallic contour.
- Inner Shadow: Add shadow with a subtle angle to create depth.
- Stroke: Optional, for chrome borders—use gradient stroke with a metallic shine.
- Open the Layer Style panel, then:
- Add Texture
- Place a brushed metal texture above the text layer, clip it using Alt/Option + Click between layers, and set blending mode to Overlay or Multiply.
- Fine-Tune Highlights
Duplicate the text and use white brushes or lighting effects on clipped layers for dynamic lighting.

Quick Design Tips: Mixing Styles for Hybrid Looks
Layer Smartly
- Use Smart Objects to combine styles (e.g., apply a neon glow to a 3D-extruded shape).
- Duplicate text layers and assign different layer styles to each.
Use Contrasting Combinations
- Try 3D + Neon for futuristic effects.
- Metallic + Glow for cyberpunk or game titles.
- Always check readability—don’t sacrifice legibility for looks.
Save Time with Presets
- Save your favorite combinations as .asl files.
- Group them by theme (e.g., “Futuristic Styles,” “Luxury Gold,” etc.)
⚡ For instant access to hybrid styles, explore our professionally made Photoshop Typography Templates that combine these effects seamlessly.
Where to Download High-Quality Layer Styles
🔹 Top Resources:
- Pixflow.net – High-end, editable Photoshop text effects in one-click presets
- Envato Elements – Diverse collection, especially for motion graphics users
🛠 Best File Types to Look For:
- .asl (Adobe Style Layer) — instantly loadable in your Styles panel
- .psd — good for examining layer setups
- .pat — if textures are included (like metal or grunge backgrounds)
Keep your styles organized in folders so you can easily access and reuse them across different projects.
Speed Up Text Effects — Automate Repetitive Steps with Photoshop Actions (.ATN)
Layer Styles handle the look of your text, but Photoshop Actions handle the process. An Action is a recorded sequence of Photoshop steps that plays back with a single click — perfect for automating multi-step text effect workflows you’d otherwise repeat manually.
Where Actions shine for text effects:
- 3D extrusion: The duplicate-layer → offset-1px → merge process taught earlier in this guide is tedious to repeat. An Action records it once and replays it instantly on any new text layer.
- Neon glow setups: Record the full sequence — Smart Object conversion, Gaussian Blur on a duplicate, Outer Glow + Inner Glow layer styles — and apply the entire neon pipeline in one click.
- Batch styling: Need the same metallic treatment across 20 title cards? Run an Action on each layer without re-configuring every Layer Style manually.
How to install: Go to Window → Actions to open the Actions panel, then click the panel menu → Load Actions → select your .ATN file. Hit the ▶ Play button on any loaded Action to run it.
Add .ATN to your toolkit: When downloading text effect resources, look for .ATN files alongside .asl, .psd, and .pat — they complement Layer Styles by automating the steps between and around the styles themselves.
Common Mistakes to Avoid
❌ Overusing Effects
- Layer styles stack quickly. If everything glows, nothing stands out.
❌ Poor Font Choice
- Decorative fonts combined with complex styles can become unreadable.
❌ Ignoring Contrast
- Ensure enough contrast between text and background, especially for neon and metallic effects.
❌ No Responsive Exporting
- If exporting for web or video, ensure resolution and file format match your output needs (e.g., PNG for transparency, high-res JPEG for posters).
❌ Not Saving Styles
After crafting a perfect style, save it! Use New Style in the Layer Style panel to make it reusable.
Conclusion
Whether you’re designing for print, digital campaigns, or motion graphics, these techniques will help you create typography that pops—and saves time.
Don’t forget:
- Experiment with combinations
- Use reusable .asl presets to streamline your work
- Download high-quality resources from trusted platforms like Pixflow
Design smart. Style faster.
Disclaimer : If you buy something through our links, we may earn an affiliate commission or have a sponsored relationship with the brand, at no cost to you. We recommend only products we genuinely like. Thank you so much.

Write for us
Publish a Guest Post on Pixflow
Pixflow welcomes guest posts from brands, agencies, and fellow creators who want to contribute genuinely useful content.
Fill the Form ✏