The Ultimate Guide to the Shape Builder Tool in Adobe Illustrator

Shapes in Illustrator
In this complete Adobe Illustrator Shape Builder Tool tutorial, you’ll learn exactly how to use the Shape Builder Tool in Illustrator—from merging and subtracting shapes to building new forms from intersections. We’ll also walk through a hands-on project and solve common problems like why the Shape Builder Tool is not working or greyed out.
And if you’re looking for shape templates that work great with your design, explore these Illustrator templates to jumpstart your next project.
Professional Illustrator Templates
What Is the Shape Builder Tool (and Why Is It So Good)?
A Simple Definition
The Shape Builder Tool (shortcut: Shift + M) is a dynamic, interactive feature that lets you combine, subtract, or create new shapes by simply clicking or dragging across selected areas of overlapping paths. Unlike other tools that rely on rigid menu options, Shape Builder gives you direct control over your artwork.
Whether you’re merging multiple icons or trimming away unnecessary parts of your design, this tool is built for speed, precision, and creative freedom.
Shape Builder vs. Pathfinder: What’s the Difference?
The Pathfinder panel uses fixed operations like Unite, Minus Front, and Intersect to modify two or more objects. It’s great for quick, one-click shape adjustments.
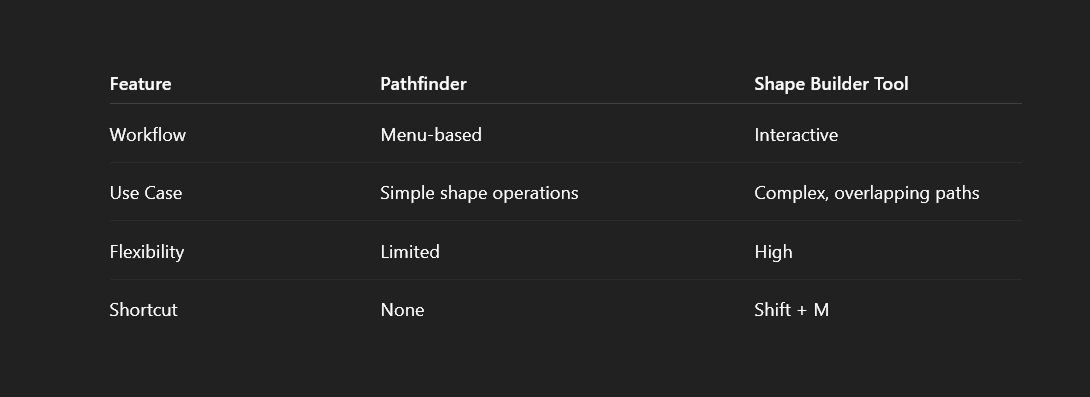
But when it comes to creating complex shapes, fine-tuning details, or visually testing different outcomes, the Shape Builder Tool offers more flexibility. Here’s how they compare:

How to Use the Shape Builder Tool: The 3 Core Functions
Merge Mode: How to Combine Shapes Into One
If you’re wondering how to combine multiple shapes into one in Illustrator, this is your answer.
- Select all the overlapping shapes.
- Press Shift + M to activate the Shape Builder Tool.
- Click and drag across the areas you want to merge. Illustrator will unite those shapes into a new, single object.
That’s it! It’s one of the fastest ways to illustrator combine shapes cleanly.
Erase Mode: How to Subtract and Delete Parts of Shapes
Need to subtract a shape from another in Illustrator?
- Select the shapes.
- Activate the Shape Builder Tool.
- Hold Alt (Windows) or Option (Mac) — your cursor turns into a minus sign.
- Click or drag over the unwanted areas to delete them.
This method is more intuitive than Pathfinder’s “Minus Front” and perfect for erasing with Shape Builder Tool precision.
Creating New Shapes from Intersections
Want to extract just one part of a complex overlap?
- With your paths selected, click directly on any enclosed intersection.
- Illustrator will create a new shape from that specific section without changing the rest.
You can use this trick to create new shapes from intersections, perfect for icon or logo work.
💡 Looking for unique shapes? Explore these Illustrator templates to empower your next project.
Practical Project: Create a Cloud Icon in Under a Minute
Step 1: Create the Basic Forms
Use the Ellipse Tool (L) to draw four or five overlapping circles. Position them to resemble a fluffy cloud.
Step 2: Unite the Shapes
- Select all the circles.
- Activate the Shape Builder Tool.
- Drag across all the areas to merge shapes in Illustrator into one.
Now you’ve got a smooth cloud shape!
Step 3: Add a Flat Bottom
- Draw a rectangle that slightly overlaps the bottom of your cloud.
- Hold Alt/Option and drag across the bottom overlap to subtract the extra curves.
This method is quick and clean—no need for extra anchor point adjustments!
Troubleshooting: Why Is My Shape Builder Tool Not Working?
Problem: The Tool Is Greyed Out or Does Nothing
Solution: The tool only works when two or more shapes are selected. If nothing is selected, Shape Builder will appear greyed out or unresponsive.
Problem: It’s Not Working on My Text
Solution: You must convert text to paths. Go to Type > Create Outlines. Once your text is outlined, Shape Builder will function normally.
Problem: It’s Creating Messy or Unwanted Edges
Solution: Double-click the tool icon in the toolbar and enable Gap Detection. This helps Illustrator detect and close small gaps that might otherwise ruin your shape merges.
Conclusion
Now it’s your turn—open Illustrator and start experimenting. And if you need inspiration or ready-to-use assets that work beautifully with the Shape Builder tool, check out our curated Illustrator shape templates.
For an in-depth guide on other essential tools, don’t forget to check out our main Mastering Adobe Illustrator: A Comprehensive Guide. Happy building!
Disclaimer : If you buy something through our links, we may earn an affiliate commission or have a sponsored relationship with the brand, at no cost to you. We recommend only products we genuinely like. Thank you so much.


