How to Transform Your Photos with Cinematic Color Grading & Lookup Tables (LUTs) in Photoshop
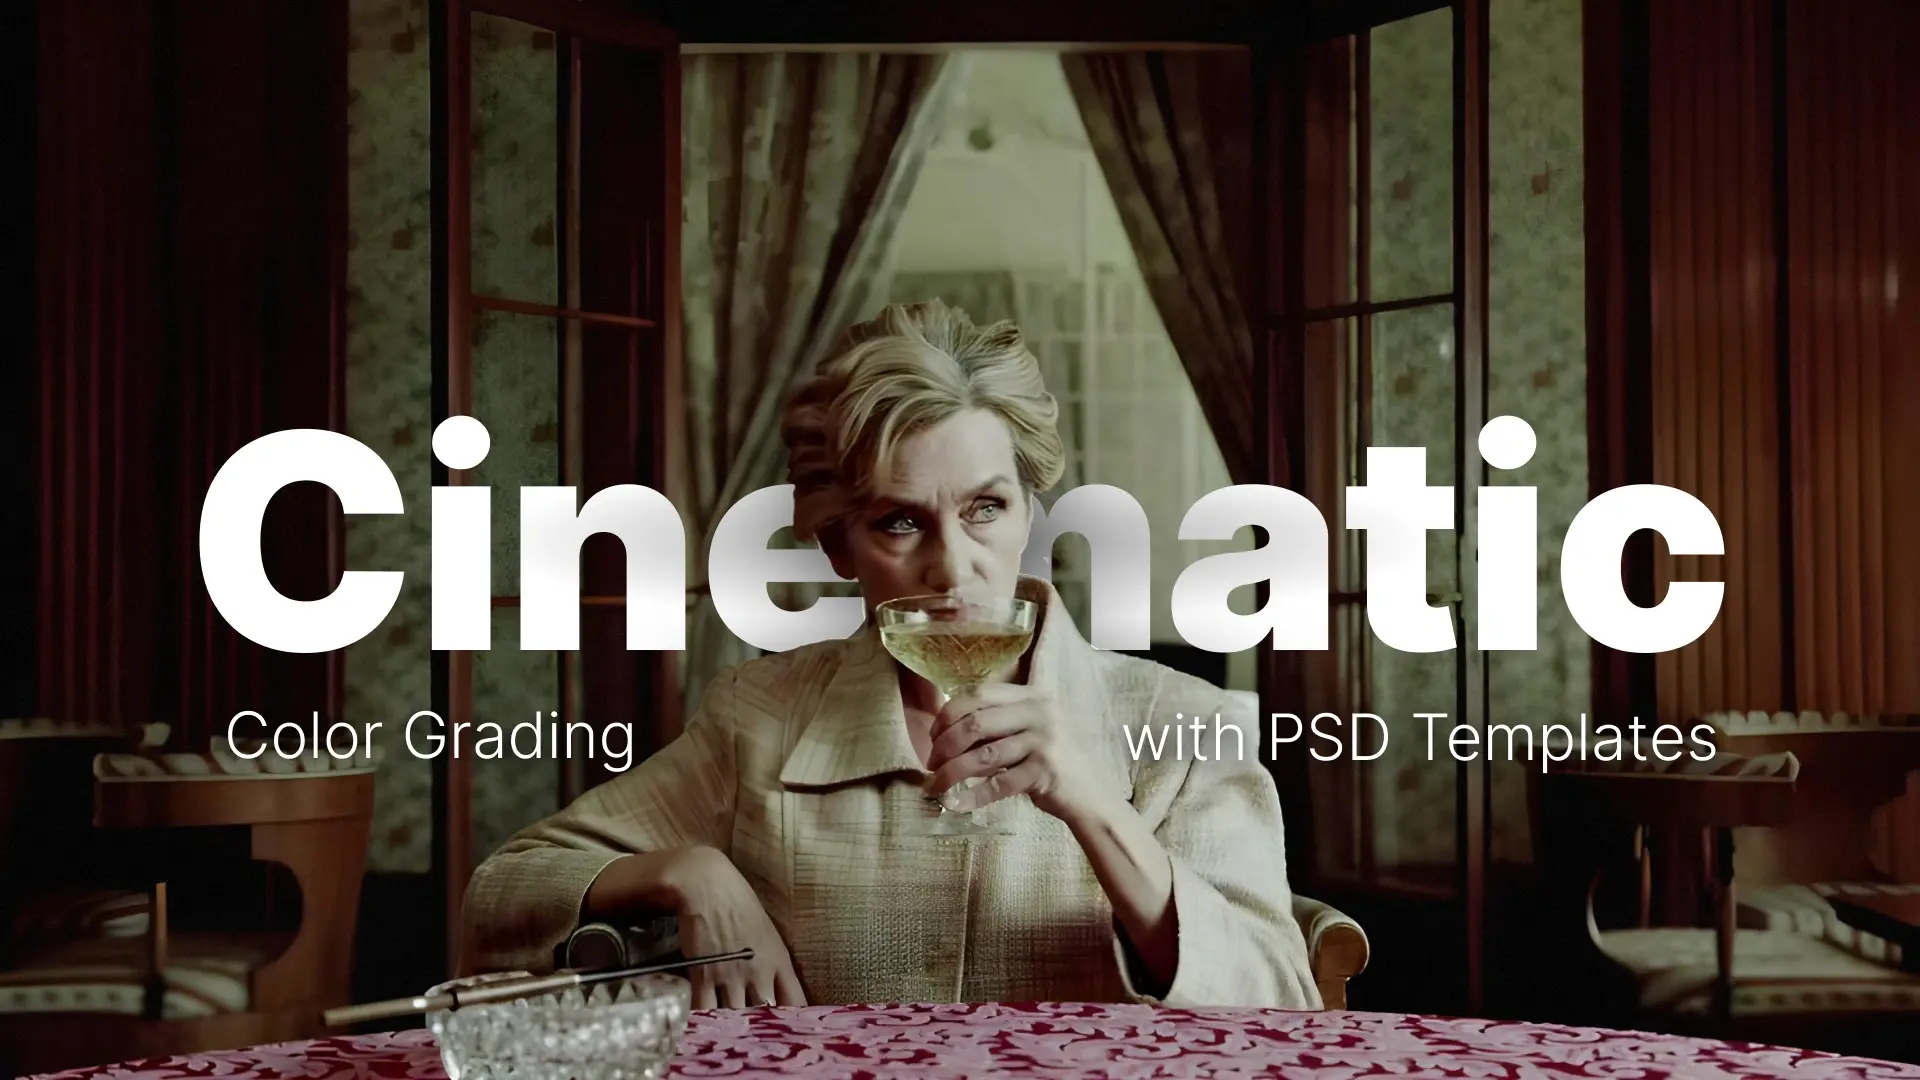
Unlock the Cinematic Look in Photoshop
Whether you’re an experienced photo editor or just starting out, learning how to apply LUTs can instantly elevate your photography with professional-grade color tones and atmosphere. In this blog, you’ll discover how color lookup tables in Photoshop work, how to install and use them, and how to create your own custom LUTs to develop your signature style.
Let’s dive into the world of cinematic color grading with LUTs and learn how to give your photos that blockbuster-worthy finish.

What Are LUTs and How Do They Work in Photoshop?
What Makes LUTs Powerful in Photoshop?
In Photoshop, LUTs are applied through the Color Lookup adjustment layer, which allows for non-destructive editing. These LUTs often come in .CUBE, .3DL, or .LOOK file formats and can completely change the mood of your image—whether you’re going for a warm cinematic vibe, cool moody tones, or even stylized vintage film looks.
While traditional editing techniques like Curves or Selective Color adjust parts of your image manually, LUTs apply a consistent, repeatable transformation—ideal for workflows that require speed and precision.
Photoshop LUT vs. Lightroom Preset
While similar in concept, LUTs are more flexible and powerful in terms of pure color transformation. Unlike Lightroom presets that only tweak sliders, LUTs can be used across software like Premiere Pro, DaVinci Resolve, and of course, Photoshop.

Choosing Your Color Palette Before Applying LUTs
Here is a practical five-step framework to help you lock in your color palette before touching a single LUT.
1. Identify the Dominant Colors in Your Photo
Open your image and study what is already there. What hues dominate the frame? Is the scene heavy on warm earth tones, cool blues, or neutral grays? Pay attention to the subject, the background, and any accent colors that draw the eye. This baseline tells you what a LUT has to work with and helps you predict how different presets will interact with your existing tones.
2. Decide on the Mood You Want to Convey
Every color palette carries an emotional weight. Ask yourself: should this image feel warm and nostalgic, cool and dramatic, or gritty and desaturated? Defining the mood upfront narrows your LUT options significantly. A portrait from a golden-hour shoot, for example, naturally lends itself to warm cinematic tones, while a moody street scene might call for teal and muted contrast.
3. Consider Lighting and How It Affects Tones
Lighting is the biggest variable in how a LUT performs on your photo. Soft, diffused light produces gentle gradients that respond well to subtle LUTs, while harsh directional light creates strong highlights and shadows that can amplify a LUT’s contrast. Mixed lighting (daylight plus artificial) may introduce color casts that shift your palette in unexpected ways. Factor in your lighting conditions so you can choose a LUT that complements them rather than fighting against them.
4. Compare Reference Images for Inspiration
Pull up two or three reference photos that capture the look you are going for. These could be stills from films, editorial photography, or even your own past edits that hit the mark. Place them side by side with your working image and compare the color temperature, saturation levels, and shadow tones. This visual comparison makes it much easier to identify which LUT category (Portrait & Beauty, Teal & Orange, Moody & Dark, Vintage Film, etc.) will get you closest to your target.
5. Use Palette Tools to Refine Your Direction
Online palette generators like Coolors and Adobe Color let you extract, build, and experiment with color schemes before committing to a LUT. Upload your reference image to pull its dominant palette, then compare it against your photo’s existing colors. This extra step gives you a concrete color target, so when you do apply a LUT, you can immediately tell whether it is pulling your image in the right direction or drifting off course.
With your palette direction locked in, you are ready to move on to the hands-on steps of loading and applying LUTs in Photoshop.
Installing and Applying LUTs in Photoshop: Step-by-Step
Step 1: Add a Color Lookup Adjustment Layer
- Open your photo in Photoshop.
- Go to the Layers panel → Click the Adjustment Layer icon → Select Color Lookup.
Step 2: Load Your LUT
- In the Properties panel, you’ll see options: 3DLUT File, Abstract, and Device Link.
- Click Load 3DLUT… and choose your .CUBE or .3DL file from your computer.
Step 3: Fine-Tune the Look
- Lower the layer opacity to soften the effect.
- Use a layer mask to apply the LUT selectively.
- Blend multiple LUTs together using different blending modes (like Soft Light or Color).
🎯 Pro Tip: Not all LUTs are created equal. Test your LUT on multiple types of images to see if it’s versatile or overly stylized.
Creating & Exporting Custom LUTs in Photoshop
Step 1: Apply Your Color Adjustments
Use adjustment layers like:
- Curves
- Color Balance
- Hue/Saturation
- Selective Color
- Gradient Maps
Stack and tweak these until you achieve your desired cinematic color grading.
Step 2: Export the LUT
- Go to File > Export > Color Lookup Tables…
- Choose your format (.CUBE is the most widely used)
- Name your file and save it.
Now you can reuse this LUT across multiple images—or even in video editors like Premiere Pro or Final Cut Pro.
✨ Want a head start with cinematic looks?
👉 Download ready-to-use LUTs from Pixflow and instantly upgrade your color grading workflow.
Tips for Better Cinematic Color Grading
Foundational Rule: Correct Your Image Before Applying Any LUT
The most common mistake in color grading is applying a LUT to an uncorrected image. LUTs remap color values based on what they receive as input, so if your base photo has blown-out highlights, a color cast from mixed lighting, or crushed shadows, the LUT will amplify those flaws rather than produce a polished cinematic look. Before reaching for a Color Lookup layer, open Filter > Camera Raw Filter (or use Curves and Levels adjustment layers) and fix the fundamentals: correct exposure so highlights and shadows have detail, set an accurate white balance so neutrals read as true gray, and adjust contrast so the tonal range is balanced. Once your base image is clean and neutral, any LUT you apply will sit naturally on top and deliver the intended cinematic tone. Think of it as priming a canvas before painting: skip the primer, and even the best paint will not stick properly.
1. Adjust LUT Intensity
The full LUT effect may be too strong for some photos. Reduce the opacity of the Color Lookup layer (around 30–70%) to make the effect more subtle and natural.
2. Use Layer Masks
Apply LUTs selectively by masking certain areas. For example, you can keep skin tones more neutral while applying the LUT only to the background.
3. Combine LUTs with Other Adjustments
Stack Curves, Selective Color, or Gradient Maps on top of your LUT to customize and refine the overall look. LUTs are a great base—but don’t stop there.
4. Experiment with Blend Modes
Switch the Color Lookup layer’s blend mode to Soft Light, Color, or Luminosity for creative results. These modes can drastically change the feel of the applied LUT.
Match Your LUT to the Emotion You Want to Convey
Before scrolling through LUT presets, decide on the feeling you want the viewer to experience. Color psychology gives you a reliable shortcut: warm tones (reds, oranges, golden hues) evoke passion, comfort, and nostalgia — reach for Portrait & Beauty or Warm Cinematic LUT packs when editing golden-hour portraits or lifestyle shots. Cool tones (blues, teals, muted greens) communicate calm, tension, or melancholy — Moody & Dark or Teal & Orange packs work well for dramatic landscapes, rainy-day street photography, or editorial fashion. Desaturated or faded tones suggest grit, realism, or vintage nostalgia — Vintage Film LUTs are ideal for retro edits and street photography. When you choose a LUT that aligns with your emotional intent from the start, you spend far less time tweaking and the final image feels more cohesive and deliberate.
5. Choose LUT Packs with Multi-Format Coverage
Not all LUT packs are built the same. When selecting a professional LUT collection, look for packs that include variants designed for different source formats, such as LOG, RAW, and REC.709. This matters because a LUT calibrated for LOG footage will behave very differently on a standard REC.709 image. Packs with broad format coverage give you maximum flexibility regardless of how your source photos or video stills were captured, and they ensure consistent results across mixed-format projects.
6. Layer LUTs with Actions and Presets for a Complete Pipeline
A single LUT sets your cinematic base tone, but pairing it with Photoshop Actions and Camera Raw Presets creates a full color-grading pipeline that handles everything from mood to polish. Start by applying your LUT through a Color Lookup layer to establish the overall cinematic feel. Next, run a retouching or sharpening Action (.ATN) to handle repeatable technical steps like frequency separation, dodge-and-burn, or output sharpening in one click. Finally, apply a Camera Raw Preset (.XMP) via Filter > Camera Raw Filter to fine-tune exposure, clarity, and HSL sliders on top of the graded result. This three-layer approach keeps each stage non-destructive and independently adjustable, so you can swap any single element without rebuilding from scratch.
🎞️ LUT Collections Tailored by Theme & Mood
Pixflow offers curated LUT packs that give your photos a signature cinematic look in seconds:
1. Portrait & Beauty LUTs
Designed to preserve natural skin tones while adding cinematic contrast and color harmony—ideal for fashion, editorial, and close-up portraits.
2. Teal & Orange LUTs
A classic blockbuster color palette perfect for travel, lifestyle, and outdoor photography. These LUTs boost skies and skin tones while giving your shots a warm, vibrant edge.
3. Moody & Dark LUTs
Perfect for forest scenes, overcast weather, and dramatic compositions. These LUTs desaturate colors and crush shadows to evoke tension and emotion.
4. Vintage Film LUTs
Inspired by analog film stocks, these LUTs add grain, faded colors, and soft contrast to give your street photography or retro edits a nostalgic feel.
5. Urban & Street LUTs
Add grit, contrast, and stylized tones to your cityscapes and urban portraits. Ideal for night shots, neon lighting, or minimalist compositions.
6. Warm Cinematic LUTs
Enhance golden hour photos, family moments, or lifestyle scenes with soft warmth and subtle glow—great for weddings, events, and storytelling.
📦 Professional-Grade, Easy-to-Use
All Pixflow LUTs come in standard .CUBE format, compatible with Photoshop, Premiere Pro, DaVinci Resolve, and more. Each pack includes multiple variations so you can choose the perfect intensity and tone for your shot.
👉 Explore Pixflow’s Cinematic LUT Packs and find the perfect look for your photography genre.
Start with Free: Try Before You Invest
If you are new to LUTs or want to test how they fit your workflow before committing to a premium pack, free LUT starter sets are a great entry point. These curated sample presets cover a range of filmmaking and photography styles and work with all major editing software, including Photoshop, Premiere Pro, After Effects, Final Cut Pro, and DaVinci Resolve. They give you a hands-on feel for how LUTs transform your images, so you can make a more confident choice when upgrading to a full professional collection.
👉 Download free LUT presets here and start experimenting today.
Conclusion
Disclaimer : If you buy something through our links, we may earn an affiliate commission or have a sponsored relationship with the brand, at no cost to you. We recommend only products we genuinely like. Thank you so much.

Write for us
Publish a Guest Post on Pixflow
Pixflow welcomes guest posts from brands, agencies, and fellow creators who want to contribute genuinely useful content.
Fill the Form ✏