How to Edit iPhone Log Files Like a Pro: Step-by-Step Guide for Stunning Videos

But why does this matter? Unlike standard footage, log files retain more dynamic range, making it easier to adjust exposure, contrast, and colors without losing quality. Whether you’re an aspiring filmmaker or a content creator, mastering log file editing on your iPhone means you can produce professional-grade videos—all from the palm of your hand.
In this guide, we’ll break down everything you need to know about editing iPhone log files, from understanding their format to using the best tools for color grading and enhancing your footage.
What Are iPhone Log Files?
Why Log Footage Matters
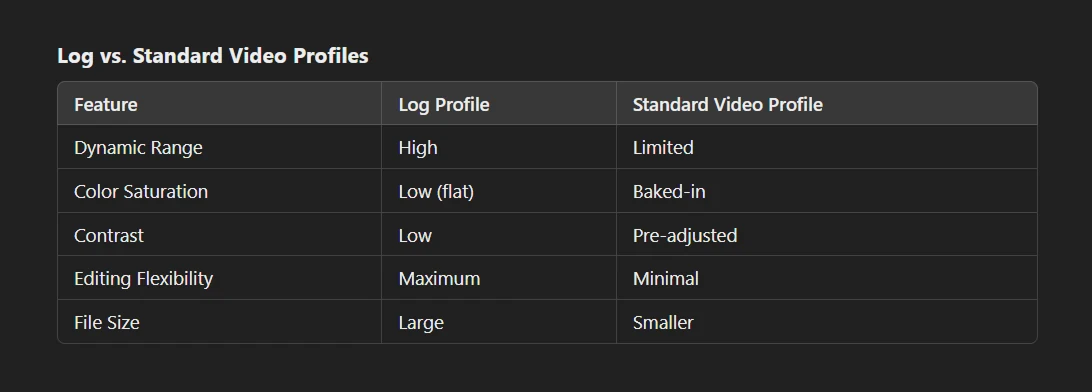
Log video retains a wider dynamic range, meaning more details in bright and dark areas are preserved. This is crucial for professional color grading, allowing filmmakers and content creators to adjust exposure, contrast, and colors without sacrificing quality.
Apple’s ProRes Log Format
Apple introduced ProRes Log to the iPhone, enabling users to capture high-bitrate video with advanced color depth. This format is particularly beneficial for those who want cinematic results without the need for external cameras.

Professional Color Grading LUTs
Tools You’ll Need to Edit iPhone Log Files
- LumaFusion – A powerful mobile video editing app with advanced color grading features.
- DaVinci Resolve – Industry-standard software for precise color grading (available on iPad and desktop).
- FiLMiC Pro – A top app for capturing log footage directly on your iPhone with custom camera settings.
Additionally, external SSDs like the SanDisk Extreme Portable SSD help manage large ProRes log files without filling up your device storage.
Guide to Editing iPhone Log Files
Step 1: Importing Log Files
- Transfer footage using AirDrop, iCloud, or an external SSD for larger ProRes files.
- Organize files with clear naming conventions and sorted folders (e.g., by date or project).
Step 2: Basic Editing
- Trim clips, arrange sequences, and sync audio in LumaFusion or DaVinci Resolve.
- Cut unnecessary footage to streamline your edit before diving into color grading.
Step 3: Color Grading Log Footage
- Adjust exposure, contrast, and white balance to restore a natural look.
- Apply LUTs (Look-Up Tables) for quick, professional-grade color grading. Check out Pixflow’s Color LUTs for high-quality presets.
Step 4: Enhancing Colors
- Fine-tune saturation, highlights, and shadows for depth and mood.
- Experiment with color tones to achieve a cinematic look that matches your style.
Step 5: Exporting Your Edited Video
- Use H.264 or ProRes for high-quality output.
- Optimize resolution and bitrate for different platforms (e.g., 4K for YouTube, 1080p for Instagram).
- Ensure a balanced file size and quality for smooth playback.
With these steps, you’ll transform raw iPhone log footage into professional, polished videos. 🚀
Check out these cinematic LUT collections.
Tips for Mastering Mobile Log File Editing
- Leverage Natural Light – Shooting in well-lit environments reduces noise and improves log footage quality.
Shoot with Your Grade in Mind to Get Better Results in Post
The quality of your color grade depends heavily on the footage you start with. A few simple shooting habits can dramatically improve how your iPhone ProRes Log clips respond to editing later.
- Use soft, diffused light whenever possible. Direct sunlight or bare bulbs create harsh contrast that even log footage struggles to handle cleanly. Position your subject near a window with sheer curtains, shoot under open shade, or wait for overcast skies. These natural soft sources wrap light evenly across your subject and give you smooth tonal transitions that are much easier to grade. The flatter and more even your lighting, the more flexibility you have in post to push the look in any direction.
- Seek out natural atmosphere for depth and mood. Foggy mornings, steam rising from a street vent, dust particles caught in a shaft of light, or golden hour haze all add visible depth to your footage that no filter or effect can fully replicate. When light passes through atmosphere, it becomes directional and textured, which gives your graded footage a more cinematic, three-dimensional quality. If you spot these conditions while shooting, take advantage of them.
- Expose for mood, not just “correctness.” Many iPhone log shooters try to nail a perfectly balanced exposure every time, but slightly underexposing your footage on purpose can produce more dramatic, cinematic results. Because ProRes Log retains strong shadow detail, you can recover darker areas in post without introducing excessive noise. Intentional underexposure preserves highlight detail (skies, windows, practicals) and gives your footage a moodier starting point that responds beautifully to contrast adjustments during the grade.
Think of these habits as giving your future editing self better raw material to work with. The less you need to “fix” in post, the more time you can spend on creative grading choices.
- Experiment with LUTs – Try different color presets to develop your unique style. Check out CL iPhone LUTs for professional-grade results.
- Start with Free LUTs Before Going Premium–If you’re new to color grading iPhone log footage, free LUT packs are the perfect low-risk way to learn the fundamentals. Apply a few free presets to your ProRes Log clips, study how each one shifts exposure, saturation, and color temperature, and you’ll quickly develop an eye for what works with your shooting style. Free LUTs load the same way as premium ones in LumaFusion, DaVinci Resolve (iPad or desktop), and most other editors — just import the
.cubefile and drop it onto your footage. Once you’re comfortable reading the changes a LUT makes, upgrading to a curated premium collection will feel like a natural next step rather than a guessing game. - Back Up Your Files – Regularly save footage on iCloud, external SSDs, or cloud storage to prevent data loss.
- Refine Your Skills – The more you practice and experiment, the better your edits will become. Push your creativity and test different looks!
You Can Use Professional LUT Packs Designed for Other Log Formats
Many iPhone creators assume they need iPhone-specific LUTs, but that is only part of the picture. Professional LUT packs built for cinema camera log profiles like Sony S-Log, Panasonic V-Log, or Canon C-Log often work beautifully with iPhone ProRes Log footage too. The reason is simple: all log profiles share the same fundamental goal, which is to capture a flat, low-contrast image that preserves maximum dynamic range. Because the starting point is similar across log formats, a well-designed LUT that maps flat log tones to a graded look will produce usable (and often stunning) results on iPhone ProRes Log clips.
How to choose the right LUT profile for your iPhone footage:
- Generic Log LUTs are your safest bet. These are designed to work across multiple log formats without being locked to one camera brand. Look for packs labeled “Generic Log” or “Universal Log” in the preset name.
- S-Log and V-Log LUTs tend to translate well to iPhone ProRes Log because their tonal curves are close to Apple’s log implementation. Start with these if a pack offers camera-specific options.
- REC.709 LUTs are different. These are designed for standard, non-log footage that already has contrast and color baked in. Applying a REC.709 LUT to your flat log clips will produce oversaturated, crushed results. Always check that the LUT is labeled for log input before applying it.
- Always fine-tune after applying. No LUT is a one-click finish. After dropping a cross-format LUT onto your iPhone log footage, adjust exposure, contrast, and saturation in your editor to dial in the final look. Think of the LUT as a strong starting point, not the end result.
This approach dramatically expands your creative options beyond iPhone-only presets and gives you access to the same cinematic looks that professional colorists use on high-end camera footage.
By following these tips, you’ll achieve professional results and streamline your iPhone video workflow.
Common Challenges and Solutions
🔹 Solution: Apply proper color grading—adjust contrast, exposure, and white balance. Use LUTs for quick enhancements.
✅ Challenge: Large file sizes slow down editing.
🔹 Solution: Store footage on an external SSD or use cloud storage to free up device space.
✅ Challenge: Limited editing features on mobile apps.
🔹 Solution: Combine mobile editing with desktop software like DaVinci Resolve for advanced color grading and effects.
By tackling these challenges, you’ll ensure a smooth and efficient iPhone log file editing workflow.
Exporting and Sharing Your Edited Videos
Best Export Settings
- Resolution: Use 4K for the highest quality or 1080p for faster uploads.
- Frame Rate: Match your original footage (e.g., 24fps for cinematic, 30fps for standard, 60fps for smooth motion).
- Bitrate:
- YouTube: 35-45 Mbps for 4K, 16 Mbps for 1080p.
- Instagram & TikTok: 8-12 Mbps for 1080p to balance quality and file size.
Optimizing for Social Media
- YouTube: Use eye-catching thumbnails and SEO-friendly titles.
- Instagram & TikTok: Export in vertical format (9:16) for better engagement.
- Captions & Subtitles: Improve accessibility and retention by adding captions.
By using the right export settings and optimization techniques, your iPhone log-edited videos will look professional on any platform.
Conclusion
Disclaimer : If you buy something through our links, we may earn an affiliate commission or have a sponsored relationship with the brand, at no cost to you. We recommend only products we genuinely like. Thank you so much.
Blog Label:
- Best apps for editing iPhone log files
- Color grading iPhone videos
- Edit iPhone log files
- How to edit log files on iPhone
- iPhone camera log settings
- iPhone log file editing
- iPhone ProRes log editing
- iPhone video editing tips
- iPhone video post-production
- log
- Log file format explained
- log video
- Mobile log file editing
- ProRes log grading on iPhone
- What are iPhone log files

Write for us
Publish a Guest Post on Pixflow
Pixflow welcomes guest posts from brands, agencies, and fellow creators who want to contribute genuinely useful content.
Fill the Form ✏


