DaVinci Resolve Fairlight Audio: How to Edit and Mix Audio Like a Pro

- What Is Fairlight in DaVinci Resolve?
- The Fairlight Page Interface
- Setting Up Your Audio Project for Success
- Importing, Syncing, and Organizing Audio
- Audio Editing Fundamentals on the Fairlight Timeline
- Fades, Crossfades, and Batch Fades
- Dynamics: Compressor, Limiter, Gate, Expander
- Fairlight FX and Third-Party Plug-Ins
- Cleaning Up Dialogue: The Professional Workflow
- Mixing Music and Sound Effects
- Buses, Submixes, and VCAs: Mixing Like a Pro
- Automation in Fairlight
- Loudness Standards and Metering
- AI Voice Tools (Studio Only)
- Elastic Wave: Retiming Audio Without Pitch Shift
- Exporting and Delivering Your Mix
- What Is New in DaVinci Resolve 20 Fairlight
- Free vs Studio: Fairlight Feature Comparison
- Pro Tips and Common Pitfalls
- Conclusion
This guide takes you from the very first time you open the Fairlight page all the way to professional dialogue cleanup, music mixing, bus routing, automation, and broadcast-grade loudness delivery. It covers DaVinci Resolve 20 specifically, with notes on what changed from earlier versions, and a clear breakdown of what the free version can do versus what you unlock with DaVinci Resolve Studio.
If your finished video is going to live alongside polished visuals, your titles and credits matter just as much as your audio mix. We recommend pairing your finished cut with the Dramatic Movie Title Templates For DaVinci Resolve, thirty cinematic title templates that drop straight into your Resolve timeline so your visuals match the sonic quality you are about to build.
Let’s get to work.
What Is Fairlight in DaVinci Resolve?
Blackmagic Design describes it this way on their official product page:
The Fairlight page features hundreds of professional audio post tools in a familiar, intuitive interface that’s designed for speed and completely integrated with picture editing. Once you’re ready to go beyond the basics, you’ll find advanced sync tools, immersive 3D mixing and mastering, third party plug-in support, loudness monitoring, full automation, customization options and much more.
The key word is integrated. Where Pro Tools users have to bounce out video, conform, sync, and round-trip, Fairlight users stay in one timeline. You can be color grading a scene in one click, then mixing the dialogue in the next, with no exporting in between. That is a massive workflow advantage for solo creators, YouTube editors, and small post-production houses.
Who Fairlight Is For
- Solo creators and YouTubers who already edit in Resolve and want their audio to sound as good as their picture.
- Indie filmmakers who cannot afford a separate audio post house but need broadcast-grade results.
- Documentary and corporate video editors working with dialogue, interviews, and music beds.
- Audio post engineers transitioning from Pro Tools who want a single tool for picture and sound.
- Podcast producers who shoot video versions of their show and want one app for both.
If you are coming from Premiere Pro and curious how Resolve compares overall, we break that down in our DaVinci Resolve vs Premiere Pro comparison.
The Fairlight Page Interface
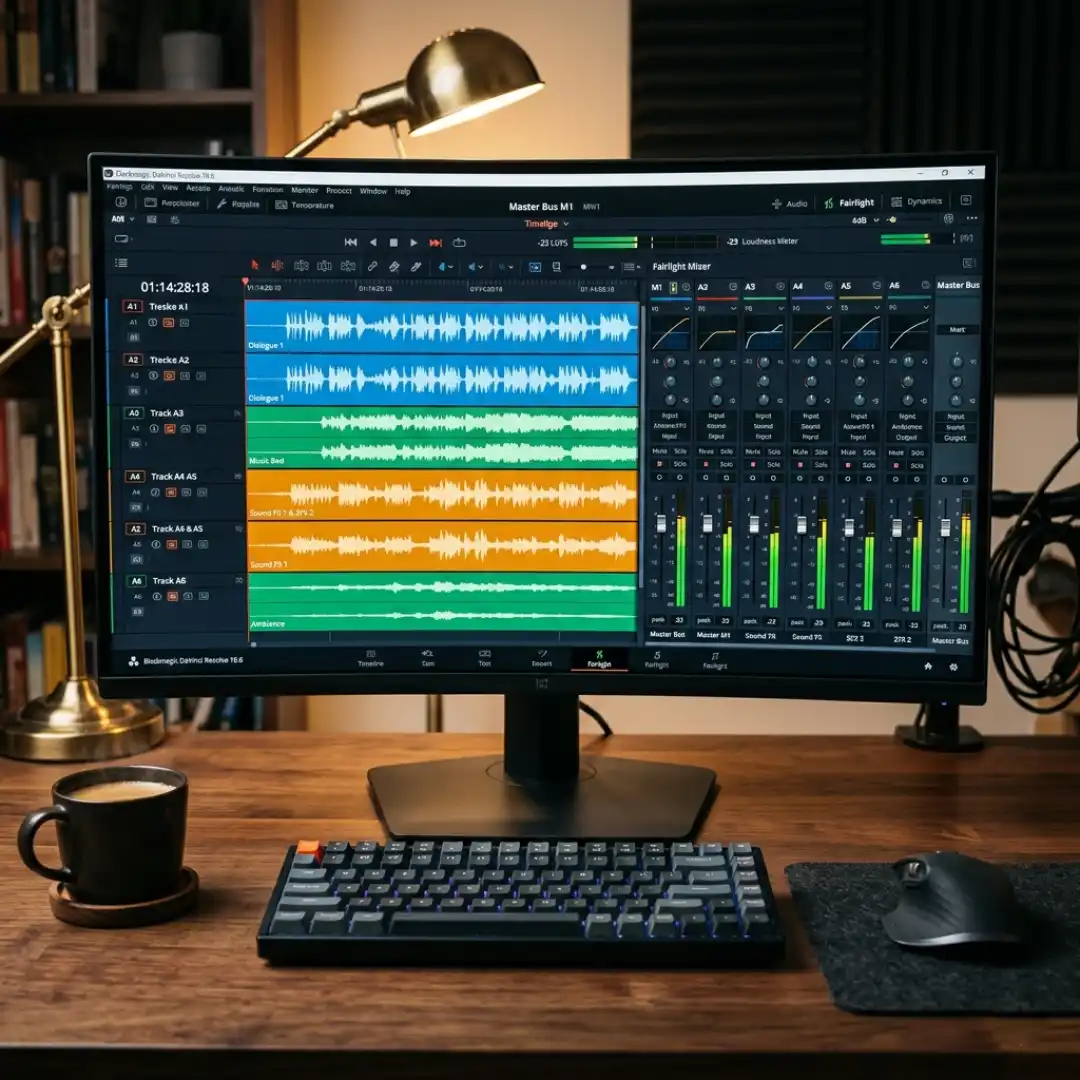
1. The Timeline
The Fairlight timeline shows your audio clips as horizontal blocks with waveform displays. Unlike the Edit page, you can stack tracks much higher (Fairlight supports up to 2,000 tracks in a single timeline) and the playhead behaves more like a DAW playhead, with optional looping and scrubbing.
2. The Mixer
Open the mixer with the mixer button in the top right. Each track gets a vertical channel strip with a fader, pan control, EQ, dynamics, sends, inserts, and automation controls. This is where you mix the show.
3. The Index and Media Pool
On the left, the Index lists every track and lets you mute, solo, color-code, and rename tracks quickly. The Media Pool holds your raw audio assets, organized into bins.
4. The Inspector
The Inspector on the right shows clip-level controls: volume, pitch, equalization, retiming, and clip-level effects. Clip-level effects are independent of the channel strip and are the secret to surgical fixes on individual takes.
5. The Meters and Monitoring Panel
At the top right, you get loudness meters, phase scopes, spectrograms, and monitoring routing. We will spend real time here later because metering is what separates amateur mixes from professional ones.
Setting Up Your Audio Project for Success
Project Settings That Matter
Go to File > Project Settings > Audio. Set:
- Sample rate to match your source. For most modern cameras and field recorders this is 48 kHz. For music-heavy work, 48 kHz is still the standard for video delivery. Higher sample rates like 96 kHz are usually overkill for video post.
- Bit depth at 24-bit minimum for working sessions. Resolve 20.1 added 32-bit float recording for the timeline voice-over tool, which gives you near-impossible-to-clip recordings.
- Audio reference level to -20 dBFS (film/broadcast standard) or -18 dBFS (European broadcast). This sets where your VU meters consider zero.
- Loudness standard to the target you are delivering to. YouTube uses -14 LUFS integrated, broadcast TV uses -23 or -24 LUFS, theatrical mixes use much higher peaks but balanced averages.
Workspace Layout
Fairlight lets you save custom workspaces. A common starting layout is mixer on the right, index on the left, meters visible top right, and a tall vertical timeline. Save it as a preset so you can recall it instantly.
If you are still finding your way around general Resolve shortcuts, our DaVinci Resolve keyboard shortcuts cheat sheet covers Fairlight-specific keys including the new Focus Mode (W) shortcut introduced in Resolve 20.1 that maximizes the timeline for distraction-free editing.
Importing, Syncing, and Organizing Audio
Importing Audio
Drag and drop into the Media Pool, or right-click and choose Import Media. Resolve handles WAV, AIFF, MP3, FLAC, BWF, and most camera-original codecs. For poly WAV files (multi-channel recordings from a Zaxcom or Sound Devices recorder), Resolve preserves the channel mapping so each lav can be split to its own track.
Syncing Production Audio
If you recorded with a separate audio recorder (the standard practice on most narrative shoots), Resolve syncs by timecode or by waveform analysis. Select your video clips, shift-select the matching audio clips, right-click, and choose Auto Sync Audio. Pick By Timecode if your camera and recorder were jam-synced, or Based on Waveform if you only have a clap or hand-slate as reference.
ProSoundEffects sums it up nicely:
DaVinci Resolve can sync audio to video files using waveform analysis or timecode, with subframe precision adjustments available in the inspector for any clips that drift.
For subframe nudging, select a clip and use the Slip controls in the Inspector. This is essential for syncing lavs to body movement on dialogue scenes.
Organizing with Track Naming and Color
Professional sessions are color-coded and named consistently:
- Dialogue tracks in blue (DIA-1, DIA-2, BOOM, LAV1, LAV2)
- Music tracks in green (MX-1, MX-2)
- Sound effects in orange (SFX-1, SFX-2)
- Ambience tracks in yellow (AMB-1, AMB-2)
- Voice-over in purple (VO)
This is not cosmetic. When you are forty tracks deep on a documentary mix, color tells your eye what you are looking at in milliseconds.
Audio Editing Fundamentals on the Fairlight Timeline
The Tool Set
- Selection (A) for picking clips and ranges
- Range Selection (R) for highlighting time-based regions across multiple tracks
- Edit Selection Mode (E) for trimming and rolling edits
- Trim Edit (T) for refining cut points
- Audio Trim (N) for non-destructive trimming with crossfade preview
- Razor (B) for slicing clips at the playhead
Layering and Comping
Drag a clip on top of another and Fairlight automatically layers it. Use the layered editing mode to comp together multiple takes of a line of dialogue or to stack ambiences. This is the foundation of ADR work in film where you replace a noisy on-set line with a clean studio recording.
Subframe Editing
Most video editors think in frames. Audio editors think in samples. At 48 kHz, there are 48,000 samples per second, or roughly 2,000 samples per video frame. Fairlight lets you zoom in to the sample level, which is essential for clicking edits where you do not want a pop.
Hold Option (Mac) or Alt (Windows) while scrubbing for fine-resolution movement, and use + to zoom the timeline progressively until individual sample waveforms become visible.
Ripple, Roll, and Slip
These three edit types behave exactly like they do in any picture editor: ripple moves everything downstream, roll changes the cut point without moving the surrounding clips, slip changes what part of a clip plays without moving the clip itself. The Fairlight Trim tool surfaces these contextually based on where you click an edit.
Fades, Crossfades, and Batch Fades
Fade Shapes
Hover near the top edge of a clip and you will see a fade handle. Drag it inward to create a fade-in or fade-out. Right-click the fade and you can choose from four curve shapes:
- Linear for clean, neutral fades
- Exponential for fast attack, slow release (good for dramatic music)
- Logarithmic for slow attack, fast release (good for dialogue tails)
- Cosine (S-curve) for the smoothest, most musical fade
Crossfades
Between two adjacent clips, drag a fade from one onto the other and Fairlight creates a crossfade. This is essential for joining two dialogue takes seamlessly, removing breath sounds, or transitioning between ambience tracks.
Batch Fades
New users miss this and lose hours. Select multiple clips, right-click, choose Fade In / Fade Out / Crossfade, set your duration once, and Fairlight applies fades to every selected clip. On a forty-minute documentary with 300 dialogue edits, batch fades save an entire day of work.
EQ in Fairlight
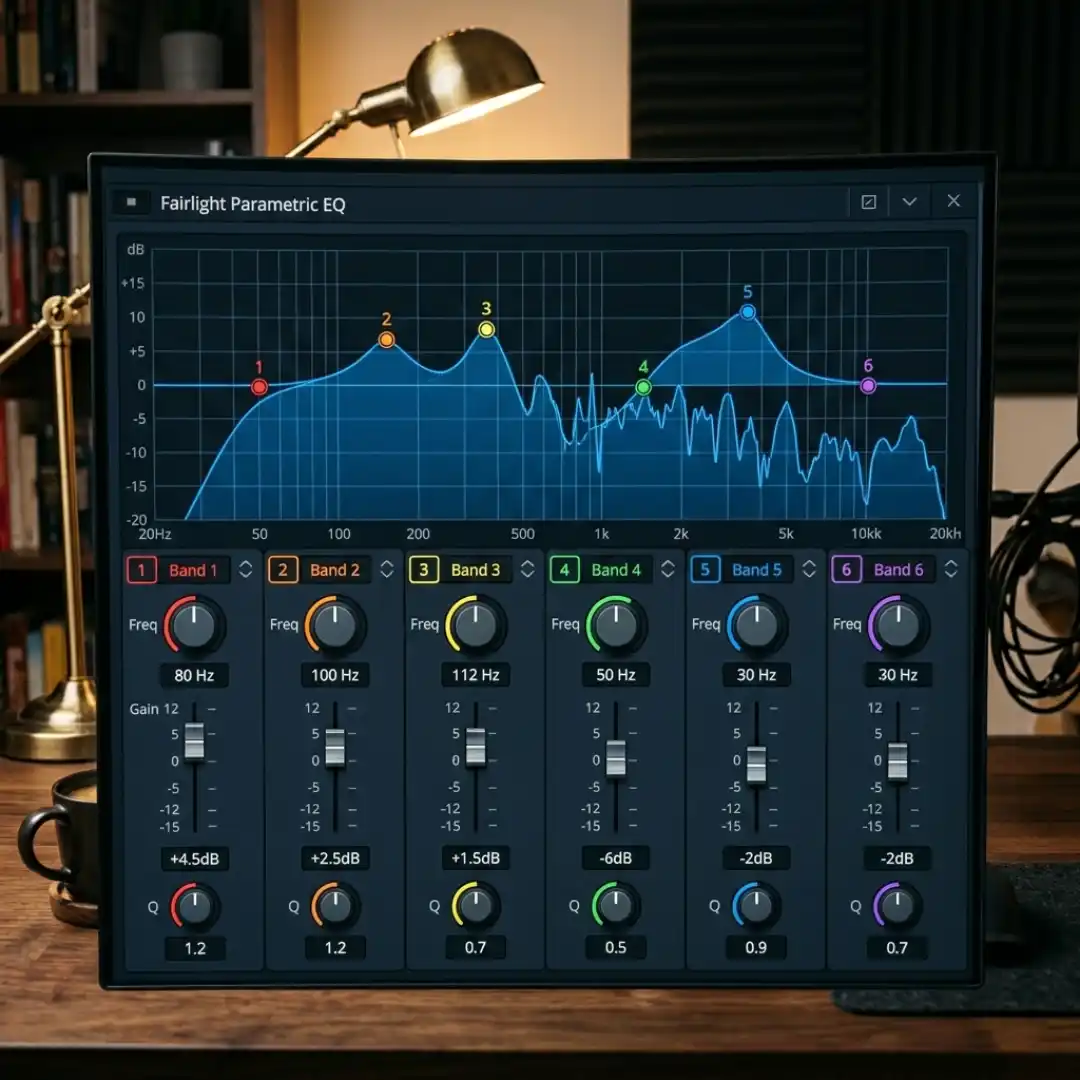
The Six-Band Parametric EQ
Open any channel’s EQ by clicking the EQ section in the channel strip. You get six bands:
- Band 1: Low cut / shelf
- Band 2: Low-mid bell
- Band 3: Mid bell
- Band 4: High-mid bell
- Band 5: High bell
- Band 6: High cut / shelf
Each band has frequency, gain, and Q (bandwidth) controls. The graphical display lets you drag the curve directly, which is the fastest way to find a problem frequency.
Built-In EQ Presets That Save Time
Fairlight ships with a strong preset library:
- Male Lav Fixer rolls off rumble and tames chest resonance around 250 Hz
- Female Lav Fixer similar but tuned for higher voice fundamentals
- Dialogue Clean adds presence around 3 kHz for intelligibility
- Music Air lifts the top end gently for sparkle
- Telephone narrows the band for an old-school phone effect
EQ Workflow Order
A pro EQ workflow follows this order:
- High-pass filter first. Roll off everything below 80 Hz for dialogue, lower for music. This kills rumble before it eats your headroom.
- Cut before you boost. Find problem frequencies (boxiness around 300 Hz, harshness around 2.5 kHz, sibilance around 7 kHz) and notch them out.
- Boost sparingly. A 2 to 3 dB boost goes a long way. Anything more usually means a different problem.
- Use narrow Q for surgical cuts. Wide Q for musical, broad-stroke shaping.
Resolve 20 added EQ as a standalone Fairlight FX plug-in (in addition to the channel-strip EQ), so you can chain multiple EQ instances on a single track, which used to require workarounds in earlier versions.
Dynamics: Compressor, Limiter, Gate, Expander
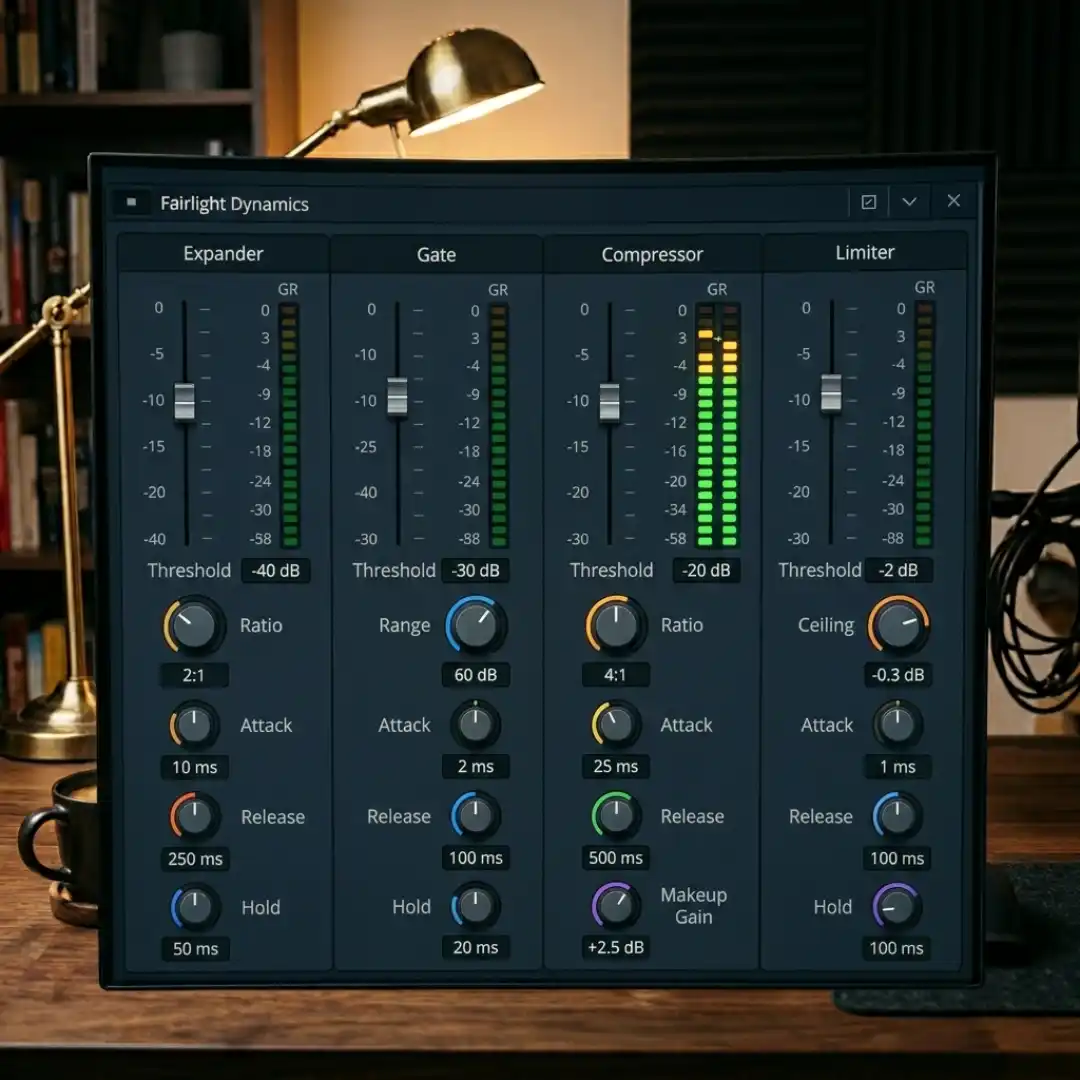
Compressor
The compressor reduces dynamic range by making loud parts quieter, then letting you boost the whole signal back up. The result: a louder, more present, more controlled sound.
Key parameters:
- Threshold: the level above which compression kicks in (usually -18 to -12 dBFS for dialogue)
- Ratio: how aggressively the signal is squashed past the threshold (3:1 for gentle dialogue, 6:1 to 10:1 for assertive control)
- Attack: how fast the compressor clamps down (3 to 10 ms for dialogue preserves consonants)
- Release: how fast it lets go (50 to 200 ms is musical)
- Knee: soft for transparent, hard for obvious pumping
- Makeup gain: restores the level you just compressed out of the signal
Limiter
A limiter is a compressor with an extremely high ratio (usually 20:1 or infinity:1) and a fast attack. Its job is to catch peaks that would otherwise clip. Put a limiter on your master bus set to -1 dBFS as a safety net.
Gate
A gate silences the signal when it falls below a threshold. Use it to clean up mic bleed on dialogue tracks: when the actor is not talking, the gate closes and you do not hear room tone or HVAC.
Watch your release time on gates. Too fast and you get unnatural chopping. Too slow and the gate stays open during silence. A 150 to 300 ms release is usually transparent for dialogue.
Expander
An expander is a softer version of a gate. Instead of muting below the threshold, it just reduces the level by a ratio (typically 2:1 or 3:1). This is gentler and more natural than a hard gate.
Order of Processing
The standard professional chain on a dialogue track is:
- High-pass filter (kill rumble)
- Expander or gate (clean up between words)
- EQ (shape tone)
- Compressor (control dynamics)
- De-esser (tame sibilance, available as a Fairlight FX plug-in)
- Limiter (catch any rogue peaks)
This order matters. EQ before compression means you are compressing the shape you want. EQ after compression means you are shaping the compressed result. Either is valid, but for dialogue, EQ-then-compress is the standard.
Fairlight FX and Third-Party Plug-Ins
Highlights of the Fairlight FX Suite
- De-Esser for taming harsh “s” and “sh” sounds
- De-Hummer for removing 50/60 Hz electrical buzz
- Noise Reduction for cleaning up hiss and room tone
- Reverb with multiple algorithmic and convolution options
- Chorus, Flanger, Phaser for creative modulation
- Echo and Delay for time-based effects
- Pitch and Pitch Shifter for transposition
- Vocal Channel as a one-stop strip for voice-over work
- Voice Isolation (Studio only) for AI-powered noise removal
Resolve 20 Improvements
DaVinci Resolve 20 added Fairlight Chain FX, which lets you save and restore a chain of plug-ins as a single preset. If you build the perfect dialogue chain (HPF, expander, EQ, compressor, de-esser, limiter), you can save it once and recall it on every dialogue track in every future project. This was a long-requested feature and matches the plug-in chains pros build in Pro Tools.
Third-Party Plug-Ins (VST and AU)
DaVinci Resolve supports VST3 plug-ins on Windows and Mac, and AU plug-ins on Mac. To enable them:
- Go to DaVinci Resolve > Preferences > Video & Audio I/O
- Add your VST or AU plug-in folder path
- Restart Resolve
- Your third-party plug-ins now appear in the Effects panel alongside Fairlight FX
This is huge if you already own iZotope RX, Waves, FabFilter, or any of the standard audio post tools. You can use them inside Resolve with no round-tripping. The 2024 ProSoundEffects guide on advanced editing notes:
External audio processes like iZotope RX can be invoked directly from Fairlight via the External Audio Process feature, sending a clip out for repair and bringing it back into the timeline as a new file automatically.
This External Audio Process feature is a Studio-only function and is one of the strongest arguments for upgrading if you do dialogue repair work.
Cleaning Up Dialogue: The Professional Workflow
Step 1: Edit Out the Mess
Before you touch any plug-in, edit the dialogue:
- Remove obvious noise (door slams, off-camera coughs, plane flyovers if possible)
- Trim long pauses to keep the pacing tight
- Comp the best take of each line if you have multiple performances
- Apply consistent fades to every cut
Step 2: Build the Chain
On each dialogue track, insert this chain in order:
- High-pass filter at 80 to 100 Hz
- Light expander (2:1 ratio, threshold around -40 dBFS) to reduce room tone between lines
- Subtractive EQ to remove boxiness (cut around 250 to 400 Hz) and harshness (cut around 3 to 5 kHz if needed)
- Compressor with 3:1 ratio, 5 ms attack, 100 ms release, around 3 to 6 dB of gain reduction on peaks
- De-Esser tuned to the specific sibilance frequency (often around 6 to 8 kHz)
- Light additive EQ for presence (small boost around 3 kHz) and air (small shelf above 10 kHz)
- Limiter on the bus, not the channel, set conservatively
Step 3: Match Tracks
If you have multiple mic positions (boom + lav, or two lavs), they will not sound identical. Use EQ on each track to match the brighter mic to the warmer one, or vice versa. The audience should not hear the cut between mics.
Step 4: Ride the Fader
Even with compression, some lines will be too loud or too quiet. Use clip gain (the volume handle in the middle of each clip) or write fader automation (see the automation section below) to keep every word audible.
For a deeper look at this entire process, see our dialogue editing techniques guide covering cleanup workflows that apply across any DAW.
Mixing Music and Sound Effects
Music Levels
A broad rule: under dialogue, music sits around -18 to -24 dBFS so it does not fight the voice. In dialogue-free montages, music can come up to -12 to -6 dBFS. Always test your mix on small speakers and headphones because music that sounds balanced on studio monitors often crushes dialogue on phone speakers.
YouTube creator Joel D. Catalan, who covers Fairlight workflow for content creators, recommends:
Keep your music averaging around -12 dB under dialogue scenes and let it breathe up to -6 dB when there’s no speech. That gives you a mix that translates well across YouTube, social platforms, and broadcast.
If you need royalty-free music sources, see our roundup of where to find royalty-free music for video editing.
Sound Effects and Foley
Sound effects do not just decorate the visuals, they sell the world. The Fairlight Sound Library (free, included with Resolve) gives you thousands of effects you can drag straight to the timeline.
For production sound that needs effects, layer aggressively:
- Hard effects (footsteps, door slams, gunshots) on dedicated SFX tracks
- Designed elements (whooshes, impacts, drones) on a separate cinematic tracks
- Ambience and room tone running underneath everything to glue the mix
Learn the layering approach in depth in our guide to sound effects layering for cinematic audio, or check our Foley sound effects at home tutorial if you need to record your own.
Filling Sonic Space with Pixflow Templates
While this guide is about audio, the visual side has to match. Once your audio is mixed, consider the Dramatic Movie Title Templates For DaVinci Resolve for finishing your project with thirty cinematic, fully editable title templates that drop into the same Resolve timeline you just mixed. Strong audio plus strong titles equals a finished piece that looks and sounds professional.
Buses, Submixes, and VCAs: Mixing Like a Pro
Buses and Submixes
A bus is a destination that receives audio from multiple tracks. Instead of mixing each dialogue track individually against the music, route all of your dialogue tracks to a single DIA bus. Now one fader controls the entire dialogue stem.
To create a bus:
- Go to Fairlight > Bus Format
- Add a new bus, give it a name (DIA, MX, SFX, AMB)
- Choose its channel format (stereo for most use cases, 5.1 or 7.1.4 for theatrical)
- On each track, route its output to the new bus
Resolve 20 introduced per-channel automation modes, so you can now set Latch on the dialogue bus and Read on the music bus simultaneously. This was a long-standing limitation in older versions.
FlexBus
Fairlight’s FlexBus architecture lets you route a channel to multiple destinations at once with independent levels. This is essential for delivering a stem mix (separate DIA, MX, SFX bounces) and a final mix simultaneously without rebuilding the routing.
VCAs
A VCA (Voltage Controlled Amplifier, a historical name from analog consoles) is a control fader that does not pass audio. Instead, it controls the gain of other faders proportionally. Assign all your dialogue tracks to a DIA VCA, and one move adjusts every dialogue track relatively. This preserves your mix balance while changing the overall level.
Practical Routing for a Typical Project
A short-form video project might have this routing:
- 4 dialogue tracks → DIA Bus → Main Mix Bus
- 2 music tracks → MX Bus → Main Mix Bus
- 6 SFX tracks → SFX Bus → Main Mix Bus
- 2 ambience tracks → AMB Bus → Main Mix Bus
- All four group buses controlled by a Master VCA for global rides
Automation in Fairlight
Automation Modes
Fairlight supports the standard four automation modes:
- Read: plays back existing automation but does not write
- Write: overwrites existing automation while you move a control
- Latch: writes from the moment you touch a control and keeps writing until you stop playback
- Touch: writes only while you are touching the control, then returns to existing values
- Trim: offsets existing automation by your moves rather than replacing it (added in Resolve 20)
Writing Your First Automation Pass
- Select a track and choose Latch mode in the channel strip’s automation dropdown
- Start playback
- Ride the fader, pan, or any plug-in parameter while the timeline plays
- Stop playback
- The automation is now recorded as a thin line on the track, which you can edit by hand
Keyframes vs Sample-Rate Automation
Fairlight stores automation at sample-rate resolution, meaning the smoothness of an automation move is dictated by your sample rate (48,000 points per second at 48 kHz). This is far more precise than keyframe-based automation in most video editors, and is one reason mixes done in Fairlight feel more musical than mixes done in the Edit page.
Pro Tips
- Use Trim mode to nudge a previously written automation pass up or down by a few dB without rewriting it
- Color your automation lanes so you can scan them at a glance
- Always disarm automation before exporting (set everything to Read) to prevent accidental overwrites on bounce
Loudness Standards and Metering
The Loudness Standards You Need to Know
Using Fairlight’s Loudness Meter
Open the loudness meter from the meters menu at the top right. Set the preset to match your delivery target. You will see:
- Momentary loudness: what is happening right now (last 400 ms)
- Short-term loudness: rolling 3-second average
- Integrated loudness: average across the entire program (this is your delivery number)
- Loudness range (LRA): dynamic range in LU
- True peak: highest peak including inter-sample peaks
Let the meter run from the start to the end of your show, then read the Integrated LUFS value. Adjust your master bus level to hit your target.
Resolve 20 Improvements
DaVinci Resolve 20 expanded the loudness meter presets to include the latest platform standards and added better LRA visualization for spotting overly compressed mixes (an LRA below 5 means your mix is squashed and lifeless).
AI Voice Tools (Studio Only)
Voice Isolation
Point the Voice Isolation effect at a noisy dialogue track and the AI separates speech from background noise in seconds. It is comparable to iZotope RX’s Voice De-noise in many real-world scenarios.
Dialogue Leveler
Automatically smooths inconsistent dialogue levels without manual rides. Useful as a first pass on interview footage with multiple speakers.
AI Voice Convert (New in Resolve 20)
DaVinci Resolve 20 added AI Voice Convert which can replace one speaker’s voice with another voice model. This is a creative tool with obvious dubbing, accessibility, and post-production applications, though it requires careful use to avoid misuse concerns.
Transcription-Based Editing (New in Resolve 20)
Resolve 20 introduced editing with transcriptions from audio where Fairlight generates a text transcript of your dialogue tracks and lets you edit by deleting text. Delete a sentence in the transcript and the corresponding audio is cut from the timeline. This is a massive workflow accelerator for interview-heavy content.
Elastic Wave: Retiming Audio Without Pitch Shift
Three Modes
- Voice mode: preserves formants for natural-sounding speech retiming
- General mode: broad-purpose, works for most audio
- Varispeed mode: changes pitch with speed (analog tape style)
Practical Uses
- Stretching a music cue to match a picture cut
- Tightening or loosening a line of dialogue to fit lip sync
- Slowing down a sound effect for dramatic effect
- Aligning ADR to original on-set production sound
Speaker Calibration and Monitoring
The -12 dBFS Pink Noise Reference
The industry-standard calibration:
- Generate pink noise at -20 dBFS in Resolve
- Play it through one speaker at a time
- Use an SPL meter (the free NIOSH iOS app works) at your mix position
- Adjust the speaker’s gain until you read 79 dB SPL (C-weighted, slow) for near-field monitoring, or 85 dB SPL for theatrical
- Repeat for each speaker
This gives you a known reference. When the loudness meter reads a certain level, you know exactly how loud the room is. Without this, you will mix too quiet on quiet days and too loud on loud days, and your delivery levels will be inconsistent.
Headphones Are Not a Substitute
Headphones flatter low end and stereo imaging. Always mix on monitors and check on headphones, not the reverse.
Exporting and Delivering Your Mix
Render Settings
Go to the Deliver page and configure:
- Format: typically MOV or MP4 with the video, or WAV/AIFF for audio-only deliverables
- Audio codec: PCM uncompressed for masters, AAC 320 kbps for streaming
- Sample rate: 48 kHz to match your project
- Bit depth: 24-bit for masters, 16-bit for final compressed deliverables
- Channels: stereo for most work, 5.1 or 7.1 for surround, Dolby Atmos for immersive
Stems and Masters
For professional delivery, render separate stems:
- DIA stem: dialogue only, fully processed
- MX stem: music only, fully processed
- SFX stem: effects only, fully processed
- Final mix: all stems summed
This lets you (or the client) repair or recreate the mix later without going back to the session.
For platform-specific export presets, see our DaVinci Resolve export settings guide for YouTube, Instagram, and TikTok.
What’s New in DaVinci Resolve 20 Fairlight
- Per-Channel Automation Modes: independent Read, Write, Latch, Touch, and Trim per track
- Trim Automation Mode: offset existing automation without rewriting it
- Fairlight Chain FX: save and recall plug-in chains as single presets
- EQ and Gain as Standalone Fairlight FX Plug-Ins: stack multiple instances per track
- Editing With Transcriptions: generate transcripts and edit audio by deleting text
- AI Voice Convert: Studio-only voice replacement
- Half-Speed Timeline Playback (Resolve 20.1): review edits at half speed
- 32-Bit Float Recording (Resolve 20.1): virtually clip-proof voice-over recording
- Focus Mode Shortcut (W key): distraction-free timeline view
- Improved Loudness Metering: expanded platform presets and clearer LRA display
If you are upgrading from Resolve 18 or 19, the chain FX feature alone justifies the move for any serious audio post user.
Free vs Studio: Fairlight Feature Comparison
Pro Tips and Common Pitfalls
Pro Tips
- Set up a template project. Save a Resolve project with empty dialogue, music, SFX, ambience tracks, buses, VCAs, your favorite plug-in chains, and your color coding. Start every new job from this template.
- Mix at consistent SPL. Calibrate your monitors once and always mix at the same listening level. Your level decisions become repeatable across sessions.
- Reference, reference, reference. Drop a commercially mastered track into your timeline. Compare your mix to it. Your ears will lie to you, but a reference will not.
- Take breaks. Ear fatigue is real. Step away every 45 minutes. What sounds great at hour four sounds awful at hour five.
- Mix in mono first. Sum your master bus to mono and listen. If the mix collapses, you have phase problems. Fix them now, not on delivery.
- Always export a mono check render. Many platforms collapse stereo to mono on certain playback paths. Catch the problem before your audience does.
Common Pitfalls
- Over-compressing dialogue. Pumping is the most common sign of a beginner mix. Aim for 3 to 6 dB of gain reduction maximum on dialogue, not 10 to 15.
- Boosting bass on monitors. If your headphones lift the bass, you will mix bass-light. Calibrate honestly.
- Forgetting to disable automation before bounce. Latch left on will write garbage automation during your export. Switch everything to Read.
- Ignoring true peak limits. A signal can read -14 LUFS integrated and still clip on a streaming platform if your true peaks exceed -1 dBTP. Use a true peak limiter on the master.
- Skipping the reference check. Every pro listens to their mix on phone speakers, laptop speakers, headphones, and monitors before delivering. The audience will, so you should too.
For the deeper philosophy of why audio matters in storytelling, our pillar guide Sound Design for Film: A Complete Guide for Video Editors and Filmmakers explains the creative principles behind every technical decision in this guide.
Conclusion
If you take only one habit away from this guide, let it be this: build a template project with your buses, VCAs, plug-in chains, and color coding already in place. Start every new project from that template. In a few weeks, your audio work will become faster, more consistent, and noticeably more professional, with no extra effort.
Pair your finished mix with strong visuals. Cinematic audio deserves cinematic titles, and the Dramatic Movie Title Templates For DaVinci Resolve drop thirty broadcast-quality title designs straight into the same Resolve timeline where you just finished mixing. One project file, one workflow, finished result.
Now open Fairlight, build the template, and mix something.
Disclaimer : If you buy something through our links, we may earn an affiliate commission or have a sponsored relationship with the brand, at no cost to you. We recommend only products we genuinely like. Thank you so much.
Blog Label:



Write for us
Publish a Guest Post on Pixflow
Pixflow welcomes guest posts from brands, agencies, and fellow creators who want to contribute genuinely useful content.
Fill the Form ✏