How to Use Nested Sequences in Premiere Pro for Complex Projects
- What Is a Nested Sequence in Premiere Pro?
- Why Editors Use Nested Sequences (5 Real Benefits)
- How to Nest Sequences in Premiere Pro (Step by Step)
- How to Unnest a Sequence in Premiere Pro (Methods That Actually Work)
- 7 Pro Workflows Where Nested Sequences Save the Day
- Nested Sequence vs Adjustment Layer vs Multicam: Which One to Use
- Performance Tips: When Nesting Helps and When It Hurts
This guide is a complete, professional walkthrough of how to use nested sequences in Premiere Pro for complex projects: multicam shoots, YouTube series, narrative shorts, effects-heavy commercials, and any timeline that has outgrown its own panel. You’ll learn what nesting actually is, every reliable way to nest and unnest, seven battle-tested workflows the pros use daily (including the Warp Stabilizer plus Speed fix and the picture-in-picture as a camera trick), how to avoid the mistakes that quietly break edits, and how to combine nesting with multicam and Team Projects for real production environments.
If you edit anything longer than ninety seconds, nested sequences will save you hours.
What Is a Nested Sequence in Premiere Pro?
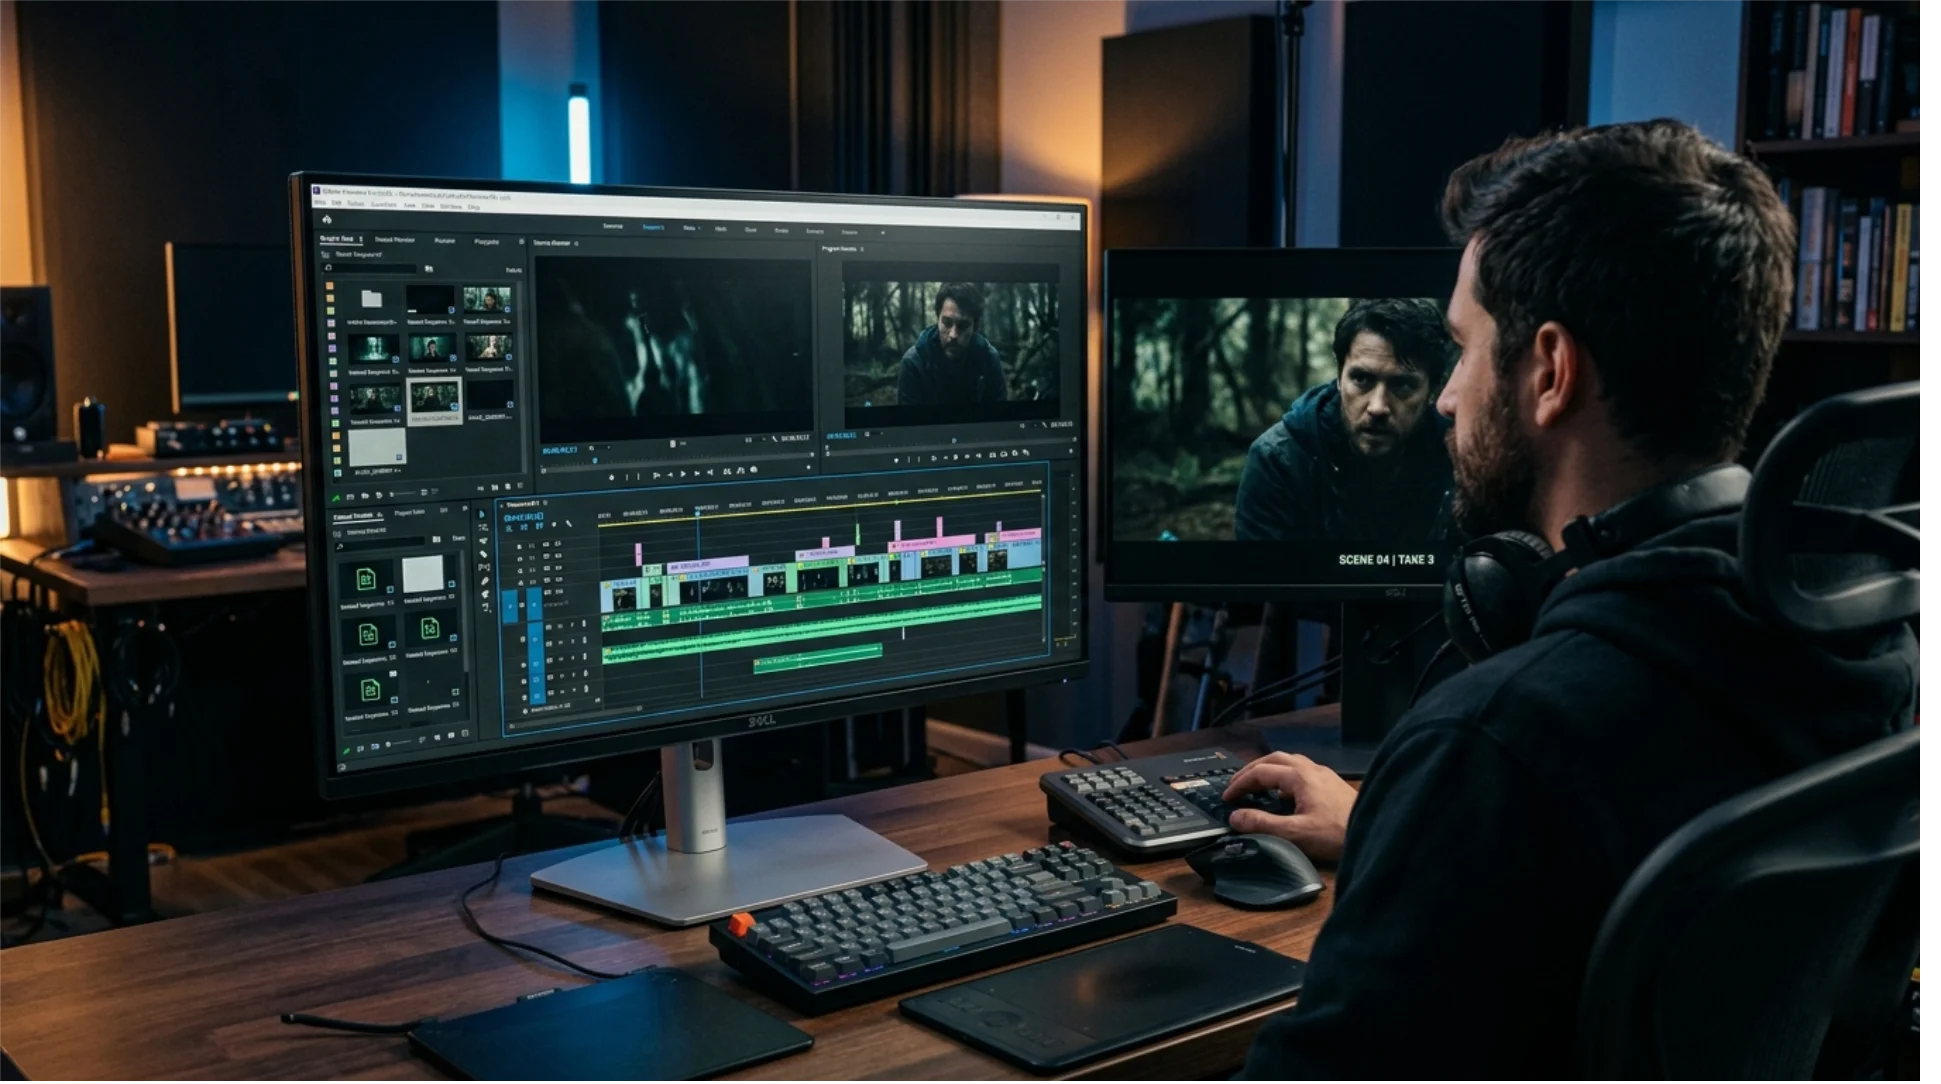
If you’ve used After Effects, you already know the concept. As the Film Riot team put it in their nesting tutorial, “If you’re familiar with After Effects, it’s essentially the same as a pre-comp.” Final Cut Pro users will recognize the parallel to a compound clip. DaVinci Resolve calls it a compound clip too. Different name, same idea: a container that turns many clips into one.
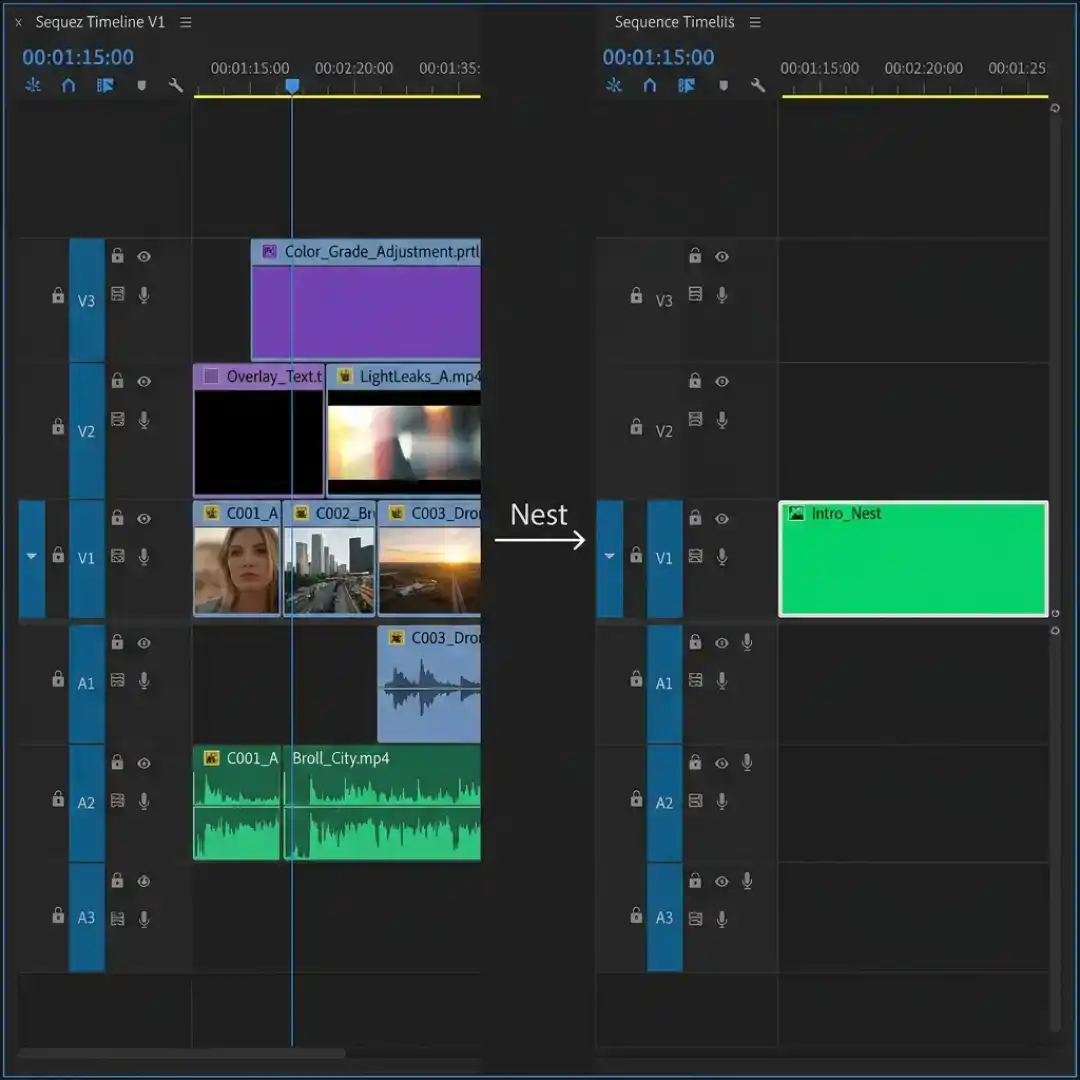
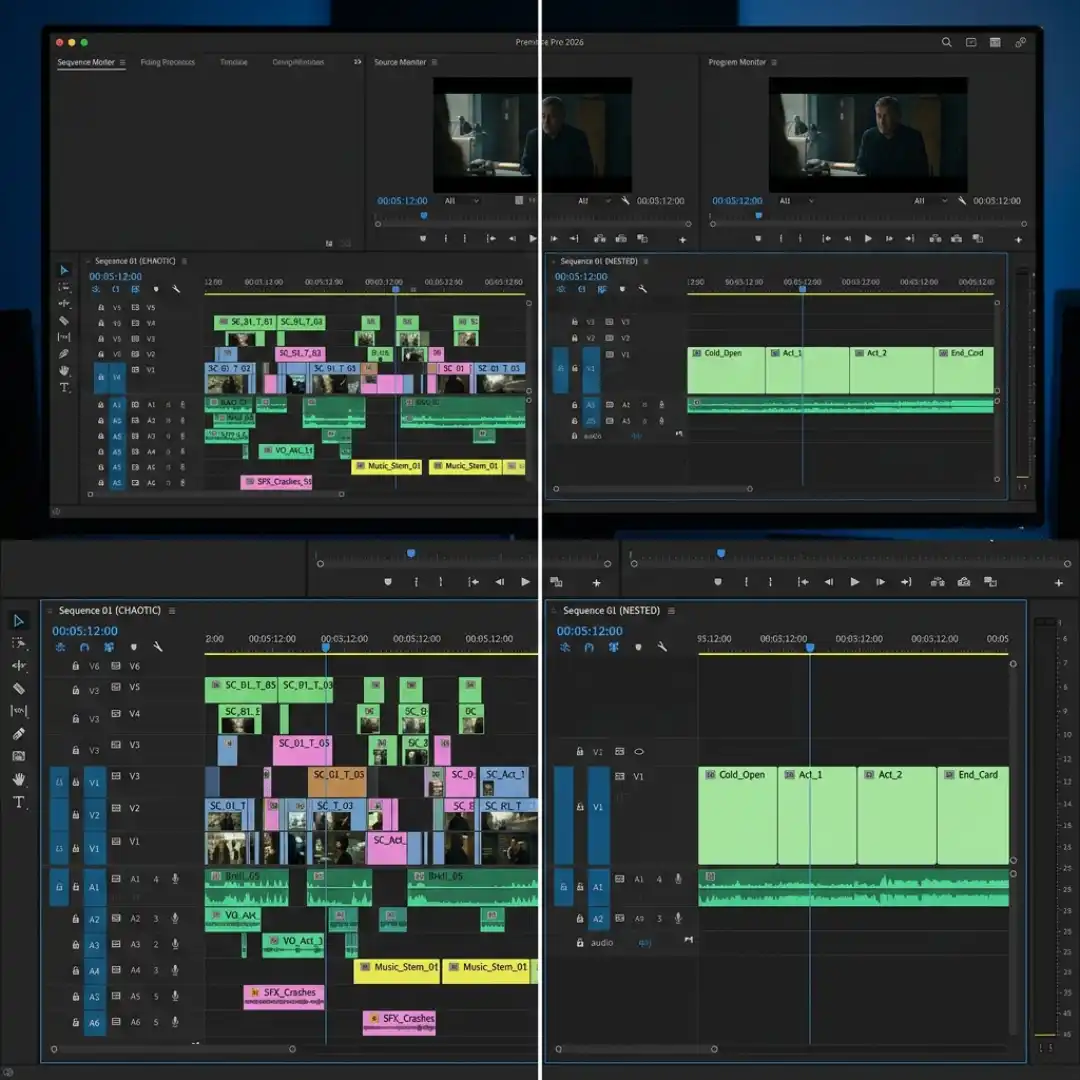
Visually, nested sequences are easy to spot. They appear bright green on the timeline. As Tella’s editing glossary describes it, a nested sequence “allows users to group multiple clips or sequences into a single new sequence” and is “particularly useful when working on complex projects.”
That is the foundation. The interesting part is what you can actually do with it. If you’re newer to Premiere and want to back up a step before diving into nesting, our beginner’s guide to creating sequences in Premiere Pro covers timeline and sequence settings from scratch.
Why Editors Use Nested Sequences (5 Real Benefits)
Cleaner, scrollable timelines
Once an edit grows past four or five tracks, scanning the timeline becomes an exercise in pattern recognition. Nesting groups related clips, an intro, an act, a B-roll sequence, a chyron stack, into one labeled green block. The timeline shrinks to something you can actually read at a glance, and your project starts to look like a story instead of a wall of footage.
Apply one effect to many clips at once
Want a single color grade across a montage? A consistent fade-in across nine clips? An RGB split on an entire act? Drop those clips into a nested sequence, then drop the effect on the nest. Every internal clip inherits it. No more selecting twelve clips and copy-pasting attributes one by one.
Smoother playback and better performance
As the Tuts+ nesting tutorial explains, “by consolidating multiple layers into a single nested sequence, Premiere Pro has fewer active elements to process during playback. The result? Smoother previews and less strain on your system, particularly in effects-heavy projects.”
Reusable modules
A show open. A lower-third pack. A title card. Build it once as a nested sequence, then drop that nest into every episode timeline. Change the nest, and every episode updates automatically. Editors working on series, podcasts, or franchised content gain back hours per cycle.
Solve technical errors Premiere can’t otherwise handle
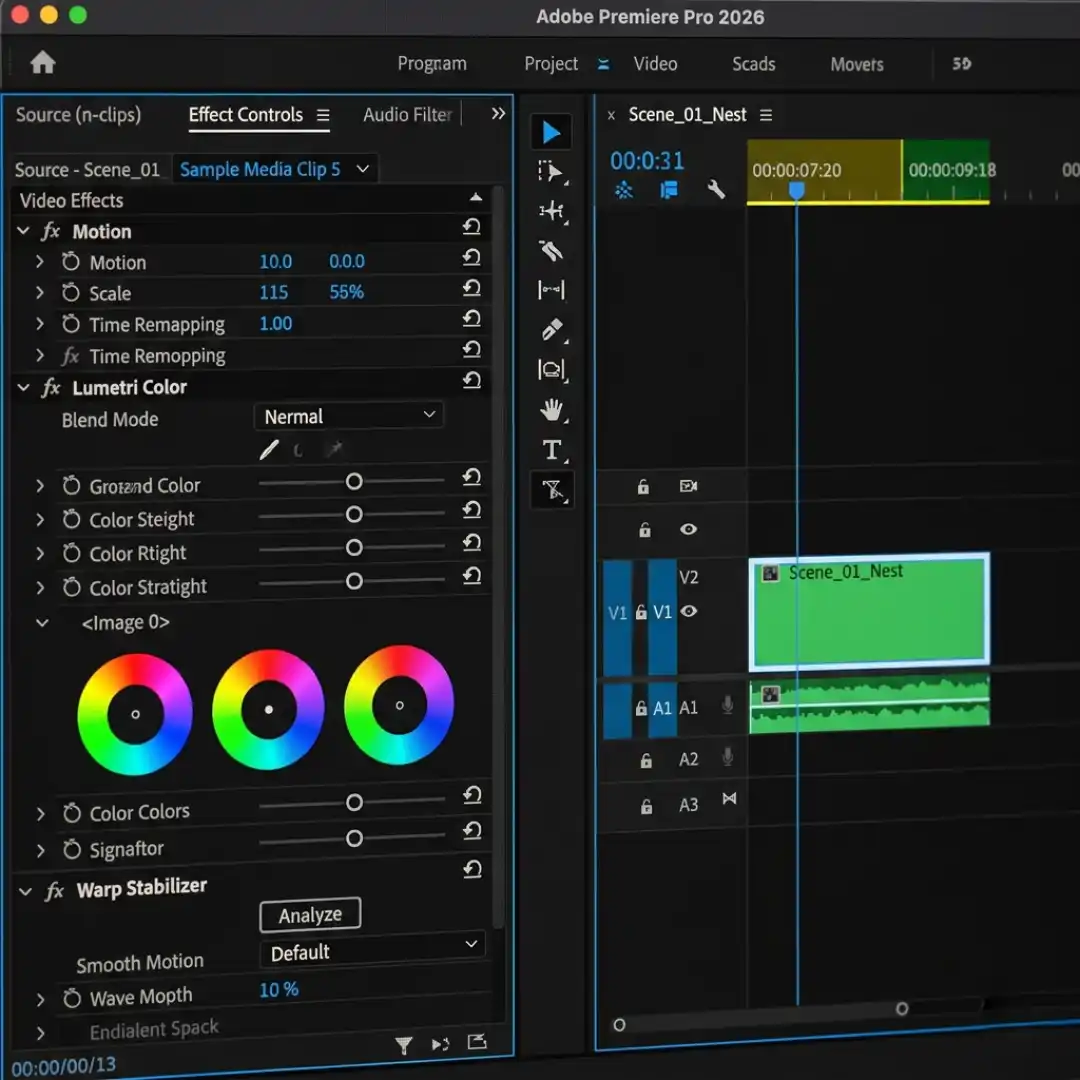
The classic example: Warp Stabilizer cannot be applied to a clip that already has a speed change. Nesting that speed-changed clip gives Premiere a fresh container to stabilize, and the error disappears. We’ll walk through the exact steps later.
How to Nest Sequences in Premiere Pro (Step by Step)
Method 1: Right-click then Nest
The most common approach.
- On the timeline, click the first clip you want to include.
- Hold Shift and click any additional clips, or drag a selection box around them.
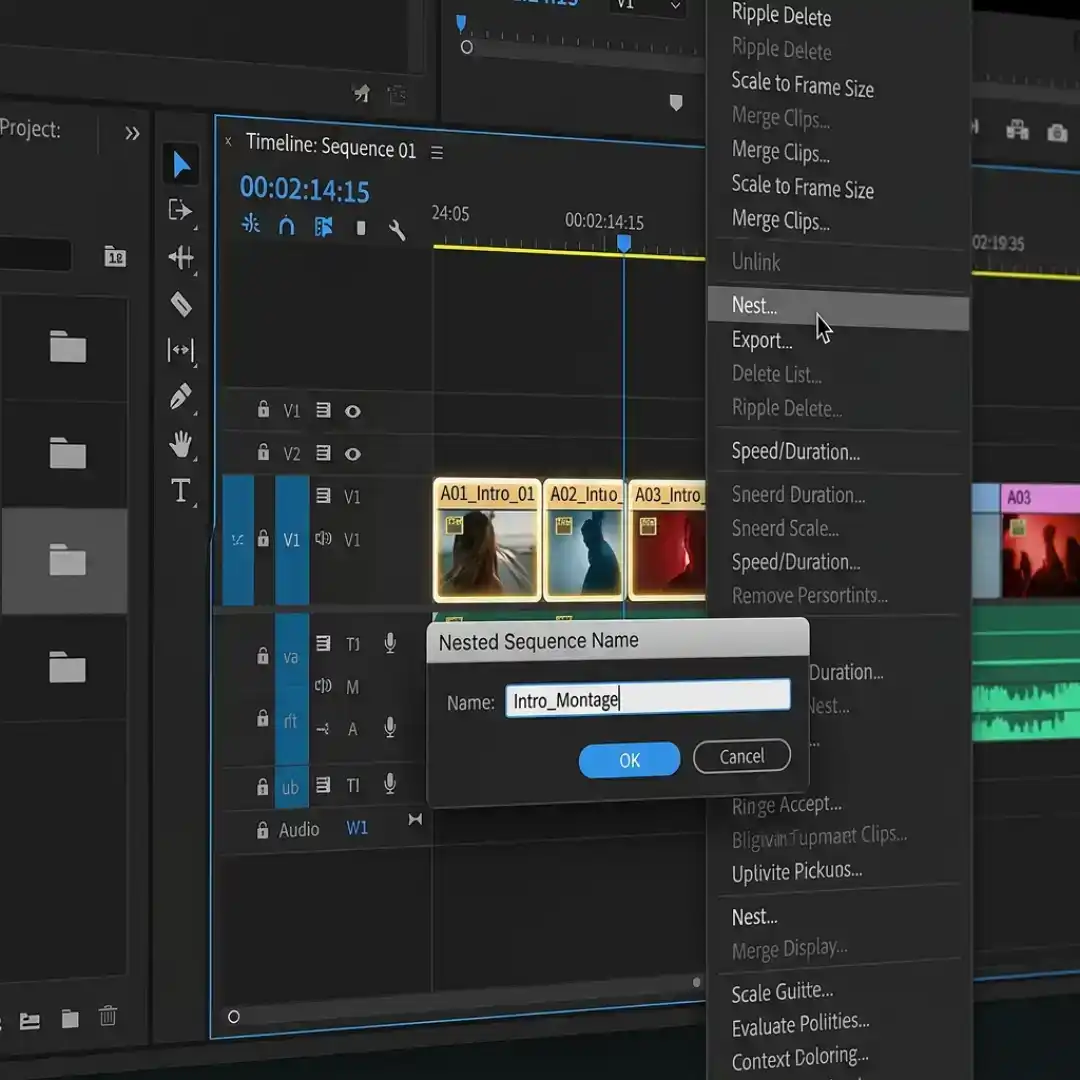
- Right-click on any selected clip and choose Nest from the context menu.
- Premiere opens a Nested Sequence Name dialog. Type a clear, descriptive name. “Intro_Montage” beats “Nested Sequence 01” every time.
- Click OK.
The selected clips collapse into a single green clip on your timeline, and a new sequence with that name appears in the Project panel.
Method 2: Clip menu then Nest
Identical result, different path. Select your clips, then go to Clip then Nest in the top menu bar. Useful when you prefer menu navigation or when right-click feels awkward (some Wacom tablet workflows, for instance).
Method 3: Drag a sequence from the Project panel into another sequence
If you already have a finished sequence (a title sequence, an interview, or an act, for example), you can simply drag it from the Project panel onto a target timeline. Premiere will place the entire sequence as a single nested clip.
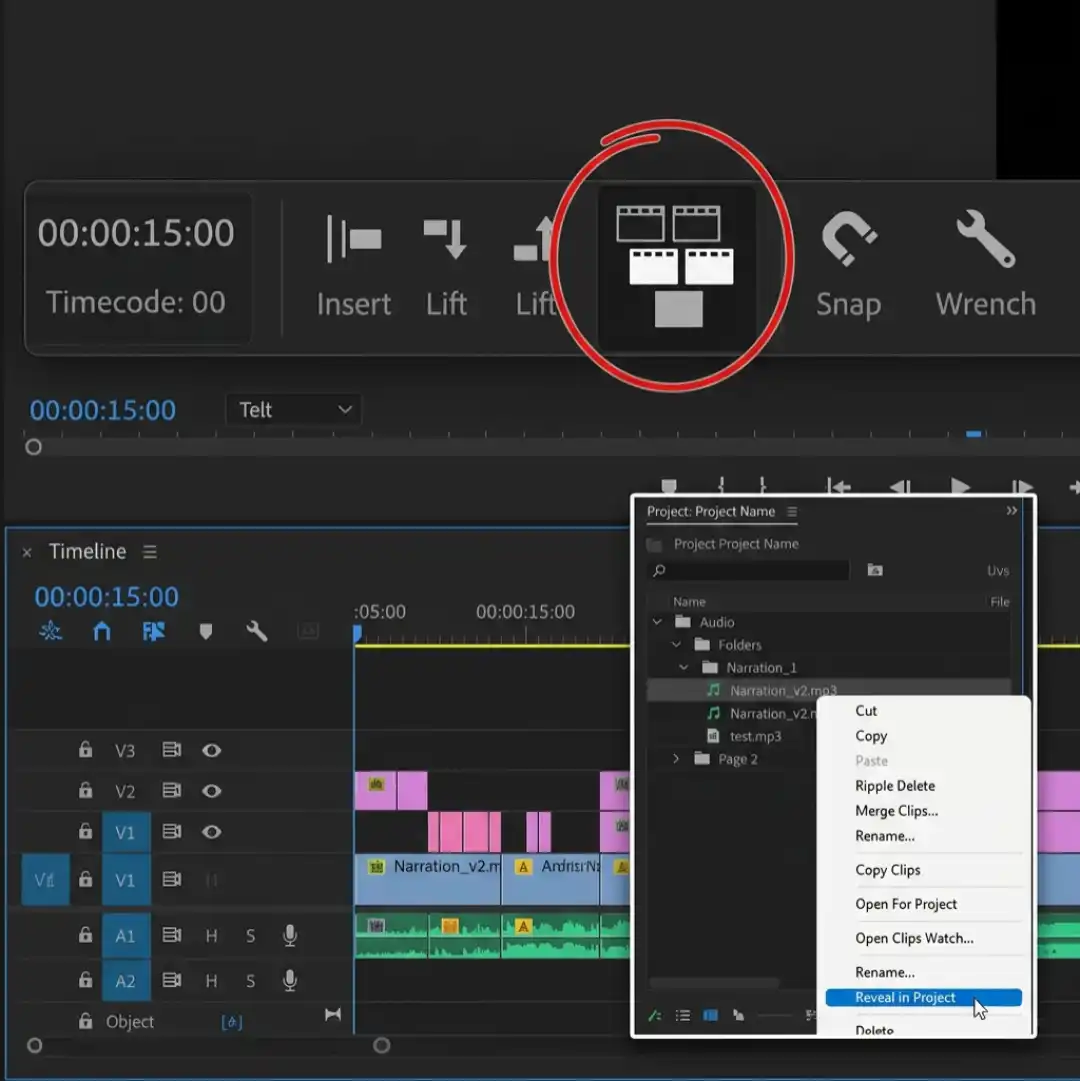
Look for the toolbar button labeled “Insert and overwrite sequences as nests or individual clips” sitting next to the magnet icon. When it’s highlighted blue, dragged sequences come in as a single nested clip. When it’s toggled off (white), the same drag brings the clips in individually. As DIY Film with Meral notes in her nesting walkthrough, “if you want your sequence to be brought in as one single clip, which is what you’ll likely want to do more often, click this Nest button.”
Method 4: Keyboard shortcut
Premiere Pro has no default keyboard shortcut for Nest, which is a small tragedy given how often editors use the feature. Fix it: go to Edit then Keyboard Shortcuts (or Premiere Pro then Keyboard Shortcuts on Mac), search for “nest,” and assign a key combo you’ll remember. While you’re in the Keyboard Shortcuts panel, our 100 Premiere Pro shortcuts cheatsheet is the fastest way to pick up the other key bindings every pro uses daily. For a deeper walkthrough on building a complete custom layout from scratch, our sibling guide on Premiere Pro keyboard customization is the next step.
Method 5: Build a nest from the Project panel
The PremiumBeat nesting tutorial highlights this elegant trick for master-sequence assembly: drag any existing sequence onto the New Item icon at the bottom of the Project panel. Premiere creates a brand new sequence with the exact same settings, ready for you to drag in other sequences as nested clips. It’s the cleanest way to build a master timeline that combines several finished sequences.
A quick note on naming. Tea Garden put it bluntly in his nesting tutorial: “For the love of Pete, please name your nested sequences something that you will remember.” On a complex project, three months later, “Nested Sequence 04” tells you absolutely nothing.
How to Unnest a Sequence in Premiere Pro (Methods That Actually Work)
Method 1: Edit then Undo
If you nested seconds ago and haven’t done anything else, just hit Cmd+Z (Mac) or Ctrl+Z (Windows). The nest dissolves and your individual clips come back exactly where they were. This only works if no further edits have happened in between. If you’ve already trimmed, moved, or added clips inside the nest, you’ll lose that work. Move on to Method 2.
Method 2: Copy and paste from inside the nest
- Double-click the nested sequence to open it in a new timeline tab.
- Press Cmd/Ctrl+A to select every clip inside.
- Press Cmd/Ctrl+C to copy.
- Return to your parent sequence tab.
- Place the playhead at the start of where the nest sits.
- Press Cmd/Ctrl+V to paste.
- Delete the original nested clip from the parent timeline.
Every individual clip lands back on the timeline with all the cuts and edits you made inside the nest preserved.
Method 3: Reveal in Project plus drag with Insert as Individual Clips toggled
This is the cleanest method when you want to fully detach.
- Right-click the nested sequence on your timeline and choose Reveal in Project.
- In the Project panel, locate the highlighted nested sequence.
- In the toolbar above the timeline, click the “Insert and overwrite sequences as nests or individual clips” button so it turns white (toggled off).
- Drag the nested sequence from the Project panel onto the timeline near, or replacing, the nested clip.
- This time, every internal clip appears individually, with all cuts preserved.
- Delete the original nested clip and the nested sequence from the Project panel if you no longer need them.
Charles Cabrera demonstrates this method in his five-uses tutorial. The key advantage: every cut made inside the nest survives. As he puts it, “you’ve still got the footage even though the nested sequence has now disappeared.”
One warning. Any effects you applied to the parent nest are not transferred when you unnest. Reapply them to the individual clips, or use an adjustment layer covering the affected range.
7 Pro Workflows Where Nested Sequences Save the Day
1. Building a master sequence from smaller scenes
Long-format projects (documentaries, episodic content, narrative shorts) live and die by how you organize them. Cut each act, interview, or scene in its own sequence. Then create a master sequence and drag each finished sequence onto it as a nested clip. Reordering scenes becomes a drag-and-drop operation. Re-cutting an act is a double-click away. The master never breaks.
If you’d rather not build modular elements from scratch every time, Pixflow’s Premiere Pro templates drop straight into a nested sequence so you can swap text and logos without touching the parent timeline.
2. Apply a single color grade across an entire edit
You’ve cut your edit. Now you need a consistent grade across thirty clips. Option A: drop a Lumetri Color effect on every clip and copy-paste settings. Option B: select everything, nest, drop one Lumetri instance on the nest, and grade once. The grade updates in real time across every internal clip, no copy-pasting required.
When the grade involves applying a creative look across the whole timeline, our sibling guide on the Premiere Pro LUT workflow covers the most efficient way to manage LUTs at scale.
3. Group effects like fade-ins, glitches, and RGB splits
Tea Garden uses this constantly for RGB split effects: nest the clips first, then stack three duplicates of the nested clip and offset the red, green, and blue channels. Doing the same on individual clips would multiply the work by the number of clips. With the nest, you do it once.
The same logic applies to a film-dissolve fade-in and fade-out across an entire segment. Drop the dissolves on the front and back of the nest, and the whole segment fades as one unit, exactly as Charles Cabrera demonstrates in his fade-sequence example.
4. Fix the “Warp Stabilizer and Speed cannot be used on the same clip” error
This one is famous. The moment you try to add Warp Stabilizer to a clip you’ve already speed-ramped, Premiere throws an error. (If you’re new to speed ramps, our walkthrough on creating speed ramping effects in Premiere Pro covers the technique end to end.)
Here’s the fix:
- Select the speed-changed clip on the timeline.
- Right-click and choose Nest. Name it something obvious like “WarpStab_SlowMo.”
- With the nested clip selected, drag Warp Stabilizer from the Effects panel onto the nest.
- Premiere accepts it without complaint and begins analyzing.
What’s actually happening, in Tea Garden’s words: “It’s going to take my slow-mo footage that’s recorded at 5994 frames per second and it’s going to make it the same sequence settings that are in my timeline.” The nest hands Premiere a clean container to stabilize, sidestepping the conflict.
5. Picture-in-picture and reusable on-screen cameras
For talking-head videos and podcasts, nesting is the secret behind clean picture-in-picture. Stack your face cam on top of your screen recording, scale and mask your face into a corner, then nest the whole stack. Now that PiP behaves as a single “camera” that you can drop in and out of an edit, or trim and move around the timeline as one block. Whatever you change inside the nest updates everywhere it appears.
6. Audio echo and decay with reverb on a nested audio clip
Nesting isn’t just for video. Take an isolated audio hit (a snare, a sound effect, a VO line), nest it, then apply Studio Reverb to the nest. Because the nest can be longer than the underlying audio, the reverb tail keeps decaying after the source has stopped. It’s the cleanest way to create realistic echo or hall ambience without distorting the source.
For more on audio shaping in Premiere, our blogs on Premiere Pro audio effects and the Premiere Pro audio mixer get into the weeds.
7. Object removal across an entire take
The Film Riot team uses this trick to fix mic-in-shot moments. Instead of masking every individual cut of a continuous take, nest all the cuts of that take into one sequence. Grab a clean still, paint the mic out in Photoshop, drop the cleaned still on top inside the nest, mask the area, and the fix carries across the entire take. As they put it, “now when we come back to our main comp, every clip is corrected and you can scale or adjust the entire stand-up footage as a single clip without worrying about multiple layers.”
Nested Sequence vs Adjustment Layer vs Multicam: Which One to Use
- Adjustment layer: apply effects over a time range, regardless of what’s underneath.
- Nested sequence: group a specific set of clips you want to treat as one unit, move together, or reuse.
- Multicam source sequence: sync multiple camera angles into a switchable clip.
These features stack. A common pro setup: build a multicam source sequence for talking-head cameras, nest a picture-in-picture stack on top, and use an adjustment layer for a final color pass across the entire timeline. For more on how project-level structure changes when you’re combining these features, see our blog on Productions vs single project.
Common Mistakes and How to Avoid Them
Mismatched sequence settings
By default, Premiere creates the nested sequence to match the parent timeline’s settings. But if you drag in clips with a different frame rate or resolution, things can look slightly off. As Tella’s nested-sequence guide warns, “if the frame rate or the resolution of the nested sequence is different from the main sequence, it might not work properly.” Either match the settings deliberately, or let Premiere conform the clip when the nest is created.
Forgetting to rename nests
“Nested Sequence 01,” “Nested Sequence 02,” “Nested Sequence 03.” Three weeks later, you have no idea which is which. Rename immediately, every time, no exceptions.
Audio drift after re-nesting
If you nest, edit inside the nest, then drag clips back to the parent timeline, audio can sometimes shift by a few frames. Sync to a sharp transient (a clap, a hit) inside the nest before re-nesting.
Effects applied at the wrong level
An effect on the parent nest affects the whole group. An effect on a clip inside the nest affects only that clip. Get this backwards and you’ll spend twenty minutes hunting for why a color grade isn’t applying to one of your shots.
Trying to extend a nest beyond its internal duration
Once a nested sequence ends, it ends. You can drag its right edge all you want on the parent timeline, but you won’t extend it past the last frame inside the nest. To extend, double-click in and add more clips. This catches most editors at least once.
Deleting the source sequence in the Project panel
If you delete the nested sequence from the Project panel while it’s still placed on the parent timeline, the parent clip goes offline. Always remove from the timeline first, or be sure you no longer need that nest anywhere.
Nested Sequence vs Adjustment Layer vs Multicam: Which One to Use
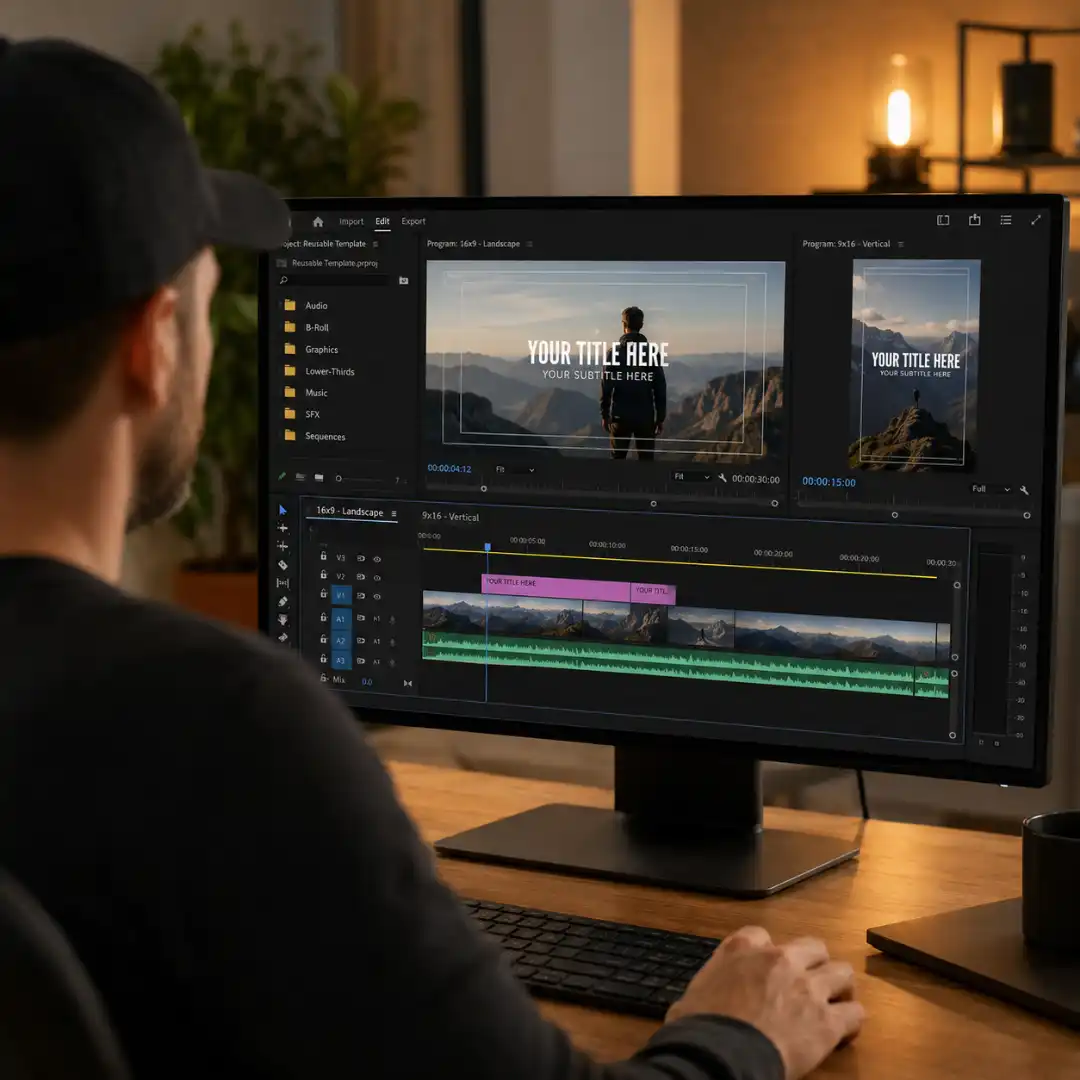
You build one reusable project file. It contains everything you would otherwise rebuild. From then on, every new video starts as a duplicate of this file.
What lives inside the template
- Pre-built sequences. A 16:9 landscape sequence (1920×1080 or 3840×2160), a 1:1 square version, and a 9:16 vertical sequence so you can export Shorts the same day. For a deeper look at vertical-specific workflow, see editing YouTube Shorts in Premiere Pro.
- Lower-thirds, end screens, and logo stings. Already placed on the timeline so you only swap text.
- Music and SFX bins. A small curated library you actually use, organized by mood (upbeat, cinematic, ambient, tense).
- Adjustment layers and LUTs. Your standard color base layer plus your branded look as a saved Lumetri preset.
- Export presets per platform. YouTube long-form, YouTube Shorts, Instagram Reels, podcast audio, each saved once.
CapCut creators get the same effect with the brand kit, saved templates, and saved adjustment presets. The principle does not change with the software. The principle is “save the thing once, never rebuild.”
The graphics shortcut most creators miss
The reason most “template projects” still feel slow is that the graphics inside them are bare. Generic title cards, default lower-thirds, and clip-art end screens make the template usable, not professional. The fast move is to pre-load a polished motion graphics pack so that every duplicate of the template starts at “this looks intentional” rather than “I will fix the graphics later.”
Pixflow’s YouTube Packs was built exactly for this slot in the workflow: 45 ready-to-edit elements including lower-thirds, openers, logo reveals, subscribe animations, and title scenes. You place them inside your template project once, and every duplicated project file from that day forward already has a professional-looking visual identity baked in. As Nick Dale puts it in his time-saving video editing methods, the goal of a template is to remove every decision that is not creative.
If you want your channel to feel visually unified, also see our guides on consistent channel branding and cinematic YouTube intros.
Performance Tips: When Nesting Helps and When It Hurts
It helps performance when you collapse many tracks into one nested clip, because Premiere has fewer simultaneous layers to render in real time. Use it on B-roll montages, multi-layer text stacks, or VFX-heavy segments.
It hurts performance when you stack nested sequences inside other nested sequences three or four levels deep. Premiere has to process every layer recursively, and the render bar above the timeline will turn red faster than you expect.
A few practical guardrails:
- Pre-render heavy nests using Sequence then Render In to Out before final export. This bakes the work and gives you back real-time playback.
- Use proxies on the source clips inside the nest, not on the parent.
- Keep nesting depth to two or three levels at most. If you find yourself going deeper, restructure.
- For VFX that exceed what nesting can handle, send the segment to After Effects via Dynamic Link. Our blogs on Premiere Pro Dynamic Link with After Effects walks through that workflow end to end.
Keyboard Shortcut and Workflow Hacks
Assign a Nest shortcut. Premiere ships without one. Add it via Edit then Keyboard Shortcuts. Most editors map it to something like Ctrl+Shift+N. The dividends are immediate.
Use the “Insert and overwrite sequences as nests or individual clips” toolbar toggle deliberately. Most of the time you’ll want it on, so clips drag in as a single nest. Flip it off when you want to bring in clips individually for fine adjustment.
Color-label your nests. Right-click a nested clip on the timeline, choose Label, and pick a distinctive color. Suddenly your green nests have visual hierarchy: intros in cyan, acts in violet, end-cards in orange. Pattern recognition speeds up.
Use Scene Edit Detection inside a nest. The Film Riot team flattens a host’s continuous take into a nest, then uses Scene Edit Detection to rebuild all the cuts inside automatically. It’s a clever way to start cleaner: cut, nest, color, then re-detect cuts only when you’re ready to fine-tune.
Nested Sequences in Multicam and Team Workflows
Multicam. A multicam source sequence is itself a kind of nest: several synced camera angles compressed into a switchable container. Layer a PiP nest on top, and you have a stylized multi-camera setup that travels as one unit. The full workflow lives in our pillar on Premiere Pro multicam editing.
Team collaboration. In Premiere Pro Team Projects, nested sequences become handoff units. One editor builds the show open as a nest. Another swaps in the new sponsor card inside that nest. The parent episode timeline updates automatically. No file conflicts, no clip-by-clip merges.
Across large multi-sequence productions, nests also act as building blocks inside the Premiere Pro Productions panel, letting teams reuse a single titled module across an entire season.
For teams that want a consistent house style baked into every episode, Pixflow’s Premiere Pro templates ship as nested sequences out of the box, so every editor on the project gets the same look without anyone having to rebuild it from scratch.
Conclusion
Three things to take with you:
- Nest for grouping, not for hiding. If you can’t tell what’s inside a nest from its name, the nest is working against you.
- Match sequence settings deliberately. The cleanest way to avoid scaling and frame-rate weirdness is to know what your parent and nested settings are before you create the nest.
- Effects go on the parent. Edits happen in the child. Internalize this and you’ll never wonder why a grade isn’t applying again.
Open your next complex project and try it on one section. Convert a chaotic act into a single labeled green clip. Drop a Lumetri grade on the nest. Move that block around with a single command. You’ll feel the difference immediately. And when you want to skip the build entirely, grab Pixflow’s Premiere Pro templates for plug-and-play nested intros, lower-thirds, and transitions that drop straight into the workflow you just learned.
Disclaimer : If you buy something through our links, we may earn an affiliate commission or have a sponsored relationship with the brand, at no cost to you. We recommend only products we genuinely like. Thank you so much.
Blog Label:



Write for us
Publish a Guest Post on Pixflow
Pixflow welcomes guest posts from brands, agencies, and fellow creators who want to contribute genuinely useful content.
Fill the Form ✏